
Raspberry Thumbprint Cookies + Video
This post may contain affiliate links, meaning that I may receive a commission at no cost to you if you use a link provided. All opinions shared are my own. You can review my full disclosure policy here.
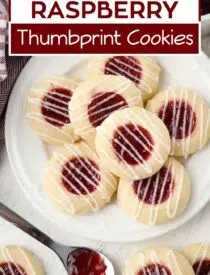

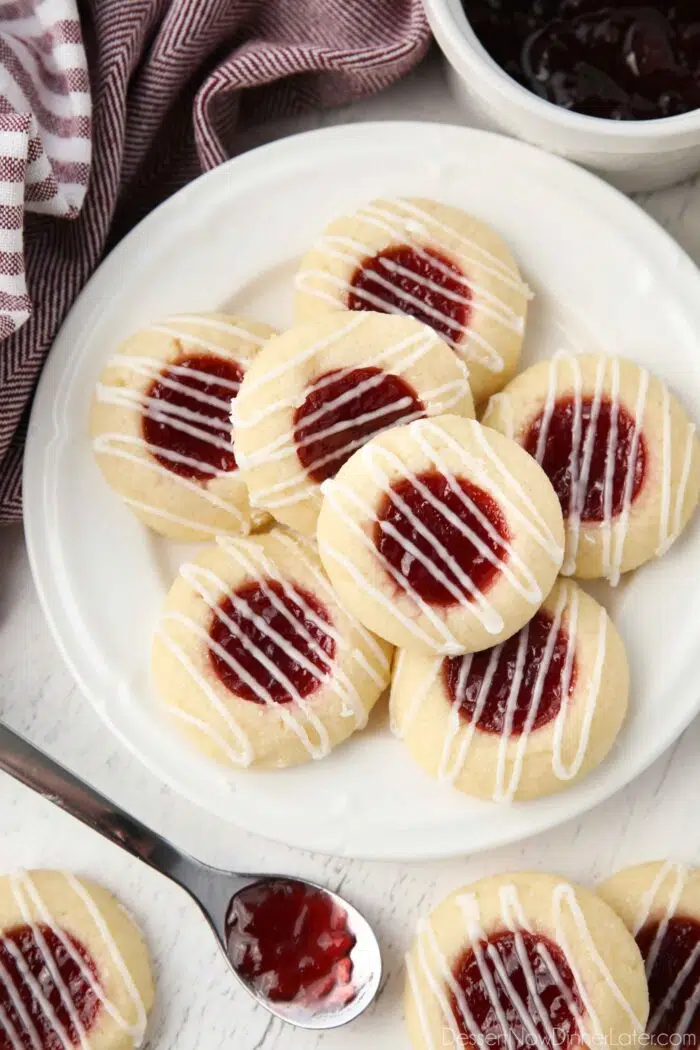
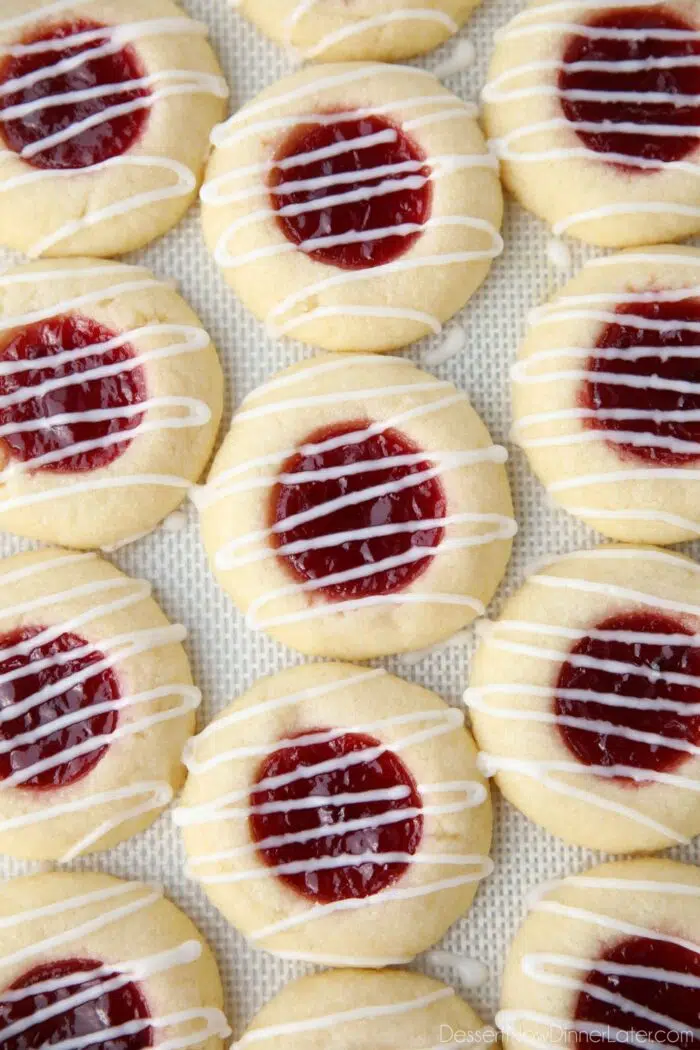
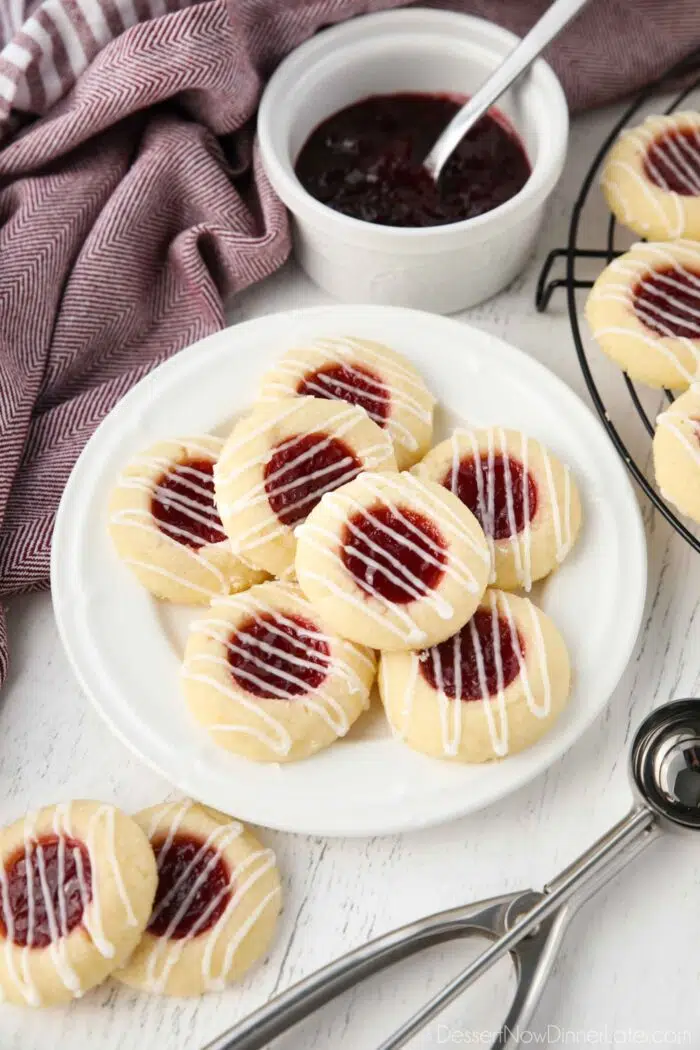
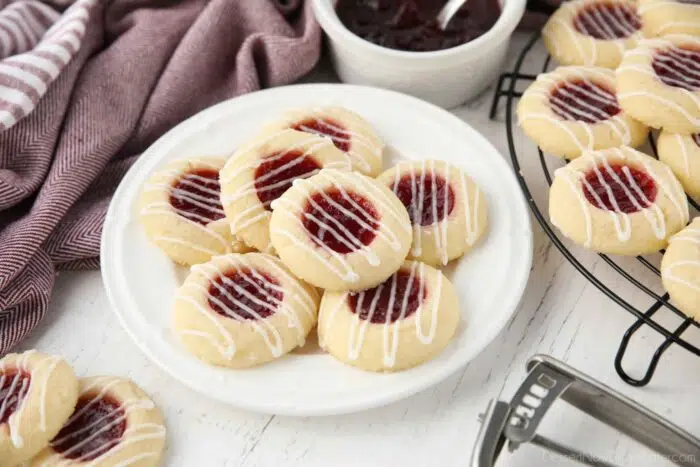
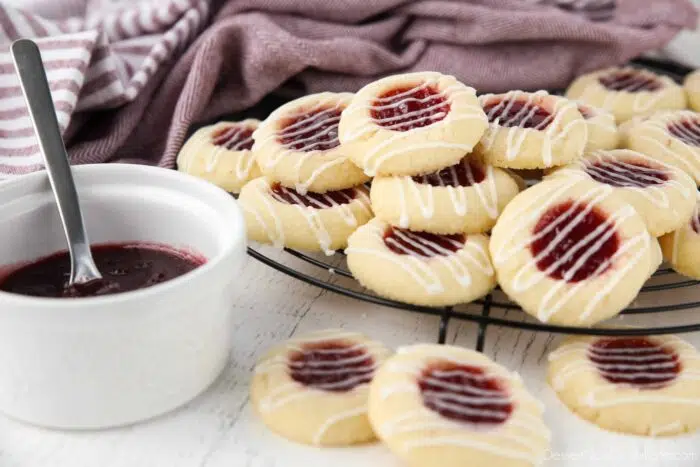
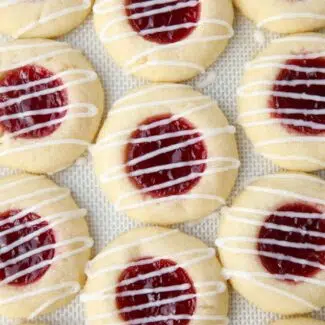
Raspberry Thumbprint Cookies are a classic shortbread cookie filled with raspberry jam, and drizzled with an almond glaze. Switch out the jam for any flavor! They’re easy and delicious!
Thumbprint Cookies
Thumbprint cookies are a holiday favorite because they are easy, beautiful, and super yummy!
These buttery sugar cookies are filled with jam, which makes them totally customizable. I prefer to use raspberry jam, but you can use ANY jam, jelly, or preserves. Other popular flavors are strawberry or apricot, but the sky is the limit with these cookies!
The jam is either filled while baking the cookies, or after it has been baked. I prefer to fill the cookies with the jam before baking because it melts slightly into the cookie and sets back up after it cools. Which makes the cookies less tacky, so they can stack easier.
Why are they called Thumbprint Cookies?
The name “thumbprint” comes from the way of making the cookies; by pressing a thumb in the center of the cookie dough to create an indent for filling.
These cookies have been known to have many different names such as “hallongrotta,” which means “raspberry cave” in Swedish. Or “jam drops” in Australia.
Thumbprints are such a versatile cookie with so many variations. While I love fruity jam-filled thumbprints, I also love turtle thumbprint cookies with a chocolate base, caramel center, and pecans on the outside. Truly endless possibilities, and all great options for those Christmas cookie exchanges.
Raspberry Thumbprint Cookies
Today I’m going to show you how to make our favorite raspberry thumbprint cookies.
And while classic thumbprint cookies don’t typically have glaze, these have just a thin drizzle of almond flavored glaze. (You could easily swap the almond extract for vanilla if you aren’t a fan.) This makes them even tastier, and oh so pretty for holiday gifting!

Make the Cookie Dough
It’s easiest to make the shortbread cookie dough with a stand mixer or electric hand mixer and large bowl.
TIP: Make sure your butter is room temperature soft. It should be soft enough to easily cut through with a knife, but not so soft that it’s like lotion.
*NOTE: See the printable recipe card at the end of the post for full ingredient amounts and instructions.
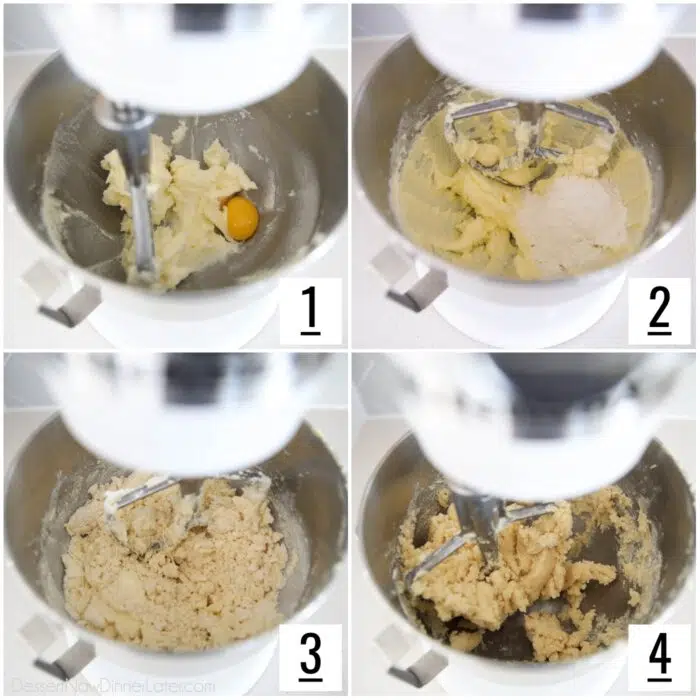
- Cream the butter and sugar together in a stand mixer with the paddle attachment until fluffy and light. Add the egg yolk and almond (or vanilla) extract. Mix to combine.
- In a separate bowl, mix together the flour and salt. Gradually add to mixer, scraping the bowl as needed.
- Dough will be dry and crumbly at first.
- Keep mixing until the dough comes together.
Shape, Press, and Chill
NOTE: Raspberry thumbprint cookies are meant to be smaller cookies. Don’t make them too big.
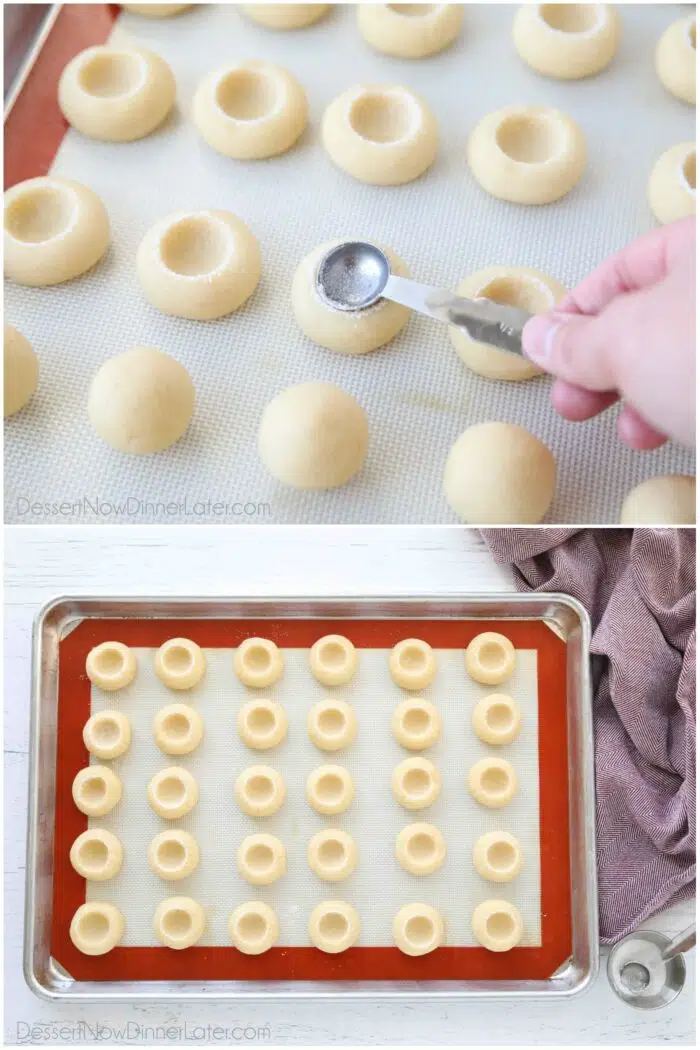
- Line a sheet pan with parchment paper or a silicone baking mat.
- Use a small #50 scoop to portion cookie dough balls, about 1 Tablespoon each, and place onto the prepared cookie sheet. NOTE: Fit all cookies on the same tray for now, so the dough balls can chill all at once.
- Roll balls with hands to smooth the outside completely. Then make a dent in the center of each dough ball with a 1/2 teaspoon or your thumb. TIP: Indent immediately after rolling the balls, while the cookie dough is still warm from your hands, to help prevent cracks. Dip the spoon, or your thumb, in granulated sugar if it sticks to the dough.
- CHILL the indented dough balls for 20 minutes in the freezer until cold and firm to the touch. This helps prevent spreading too much.
Fill and Bake
- While the dough is chilling, preheat the oven to 350 degrees Fahrenheit.
- Place jam in a small microwave-safe bowl. Nuke jam for 5-10 seconds, and stir until jam is smooth. The jam should not be hot, but be more fluid.
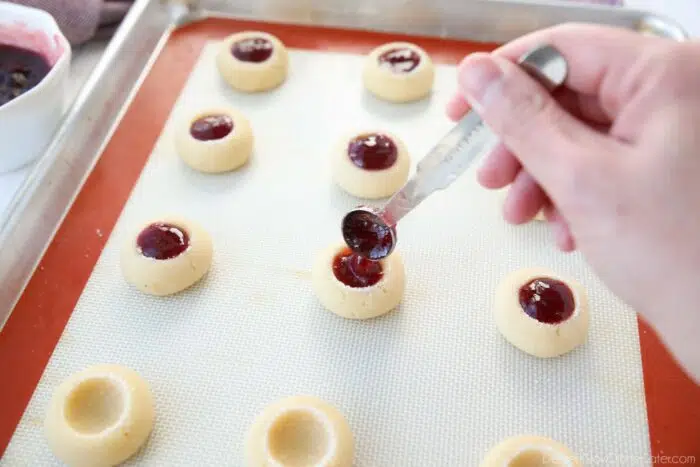
- Place cookies 2 to 3 inches apart on a parchment or silicone lined baking sheet. (Do not bake the cookies all at once on the same tray. I fit 15 cookies on my half-sheet tray.) Leave remaining cookies in freezer until ready to bake.
- Quickly fill cookie wells with a rounded 1/2 teaspoon of jam.
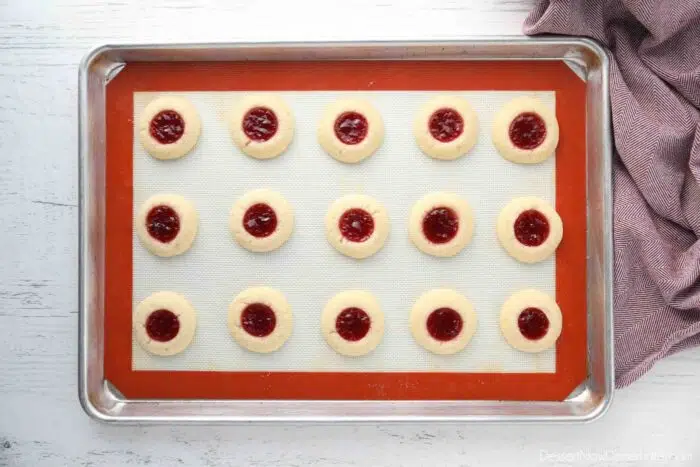
- Bake in batches at 350˚F for 14 to 18 minutes, until edges are lightly browned. Allow cookies to cool on the cookie sheet.
- Make the glaze. Mix the powdered sugar, almond (or vanilla) extract, and milk to form a glaze. Drizzle or place glaze in a zip-top bag, make a small cut in the corner, and pipe a zig-zag over the cookies. Allow the glaze to set before eating.
Storing and Freezing
- Store these raspberry thumbprint cookies in an airtight container at room temperature. There’s no need to refrigerate them. These cookies will keep for at least a week before starting to dry out and get crumbly.
- To Freeze: Allow cookies to cool for a few hours so the jam sets, then stack the cookies in an airtight container with parchment paper between the layers. The cookies will keep in the freezer for up to 1 month. NOTE: You may want to leave the glaze off if choosing to freeze the cookies.
Tips for Perfect Raspberry Thumbprint Cookies
Here are some common problems and tips for success in making thumbprint cookies.
- Preventing cracks: Roll the dough really well with your hands, so it’s smooth all the way around. Press the well in the center of the cookie dough immediately after rolling the dough into a ball, while it still slightly warm from your hands. I noticed that when I tried to roll all the balls first, and then indent them all at once, they would crack. It’s easily fixed by re-rolling the dough and indenting it immediately.
- Egg Yolk. Most shortbread cookies don’t use eggs. I decided to add just the egg yolk to my recipe to help the cookie dough hold its shape and bind together. This also helps with preventing cracks.
- Preventing too much spread: If your thumbprints spread too much, the butter wasn’t cold enough, the oven was too hot, or you put your cookie dough on a hot/warm tray. Chill the shaped dough until firm (can’t indent with finger), use an oven thermometer for accurate temperature, and use a cooled tray for each batch of cookies.
- Jam leaked out: I guess it goes without saying that you should only use the amount of jam that will fit into the well. I like to use a measuring spoon to make my indents because then I know exactly how much jam will fit in the well. It’s ok if the jam is slightly rounded on top before it bakes, but don’t make it heaping full.
- Forgot to add the jam before baking: Re-indent the cookies immediately after they come out of the oven and fill with jam while still warm. Just know that the jam may be slightly tacky still after the cookies have cooled completely.
More Christmas Cookies
If you like this recipe, you might also want to try these:
- Meltaway Cookies
- Christmas Peanut Butter Cookies
- Snowball Cookies
- Double Chocolate Crinkle Cookies
- Soft Gingersnap Cookies
- Oatmeal Florentine Cookies
If You Make This Recipe, Please Rate and Review it in the Comments Below. THANKS!
Raspberry Thumbprint Cookies
Ingredients
Cookies:
- 1 cup (226 g) unsalted butter, room temperature; 2 sticks
- ⅔ cup (133 g) granulated sugar
- 1 large egg yolk, (no whites)
- ½ tsp almond extract, or vanilla extract
- 2¼ cups (270 g) all-purpose flour, stir, spoon & level
- ½ tsp salt
- ½ cup (147 g) seedless raspberry jam, See NOTES
Glaze:
- ½ cup (60 g) powdered sugar
- ½ tsp almond extract, or vanilla extract
- 2-3 tsp milk
Equipment
Instructions
- Cream the butter and sugar together in a stand mixer with the paddle attachment until fluffy and light. Add the egg yolk and almond (or vanilla) extract. Mix to combine.
- In a separate bowl, mix together the flour and salt. Gradually add to mixer, scraping the bowl as needed. Dough will be dry and crumbly at first. Keep mixing until the dough comes together.
- Line a sheet pan with parchment paper or a silicone baking mat. Use a small #50 scoop to portion cookie dough balls, about 1 Tablespoon each, and place onto the prepared cookie sheet.NOTE: Fit all cookies on the same tray for now, so the dough balls can chill all at once.
- Roll balls with hands to smooth the outside completely. Then make a dent in the center of each dough ball with a 1/2 teaspoon or your thumb. TIP: Indent immediately after rolling the balls, while the cookie dough is still warm from your hands, to help prevent cracks. Dip the spoon, or your thumb, in granulated sugar if it sticks to the dough.
- Chill the indented dough balls for 20 minutes in the freezer until cold and firm to the touch. This helps prevent spreading too much.
- While the dough is chilling, preheat the oven to 350 degrees Fahrenheit.
- Place jam in a small microwave-safe bowl. Nuke for 5-10 seconds, and stir until jam is smooth. The jam should not be hot, but be more fluid.
- Place cookies 2 to 3 inches apart on a parchment or silicone lined baking sheet. (Do not bake the cookies all at once on the same tray they were frozen on. I fit 15 cookies on my half-sheet tray.) Leave remaining cookies in freezer until ready to bake.
- Quickly fill cookie wells with a rounded 1/2 teaspoon of jam. Bake in batches at 350℉ for 14 to 18 minutes, until edges are lightly browned. Allow cookies to cool on the cookie sheet.
- Make the glaze. Mix the powdered sugar, almond (or vanilla) extract, and milk to form a glaze. Drizzle or place glaze in a zip-top bag, make a small cut in the corner, and pipe a zig-zag over the cookies. Allow the glaze to set before eating.
Video
Notes
- You may use any jam, jelly, or preserves with or without seeds to fill these thumbprint cookies with.
- Store these raspberry thumbprint cookies in an airtight container at room temperature. There’s no need to refrigerate them. These cookies will keep for at least a week before starting to dry out and get crumbly.
- To Freeze: Allow cookies to cool for a few hours so the jam sets, then stack the cookies in an airtight container with parchment paper between the layers. The cookies will keep in the freezer for up to 1 month. NOTE: You may want to leave the glaze off if choosing to freeze the cookies.


7 Comments on “Raspberry Thumbprint Cookies + Video”
This recipe was awesome !!! I actually made it twice already…. The first time I made it with raspberry like the recipe says & then I made it with strawberry & next I’m going to make them with pineapple 🙂
Wonderful! I just made it with lemon curd. It’s a great recipe for all fruit fillings!
I can’t comment on the flavor because I threw the dough in the trash. It never “came together” was just a crumbly mess, the second that I even touched the ball with the back of a 1/2 tsp, it reverted to crumbs. And the number of pop up ads made this recipe almost impossible to navigate.
Hard pass. What a waste of money
Sounds like your butter was too cold or you may packed your flour when you measured it. It shouldn’t be crumbly at all. It is also best to round them and then press them immediately while they are still warm from your hands. Sorry you struggled with the recipe.
Is there any way to freeze the cookie dough?
Yes. You can shape it and make the thumbprint. Then freeze the shaped dough in single layers. Remove from freezer and fill with jam when you’re ready to bake.
I used 2 C of Cup4Cup gluten-free flour and it worked well.