
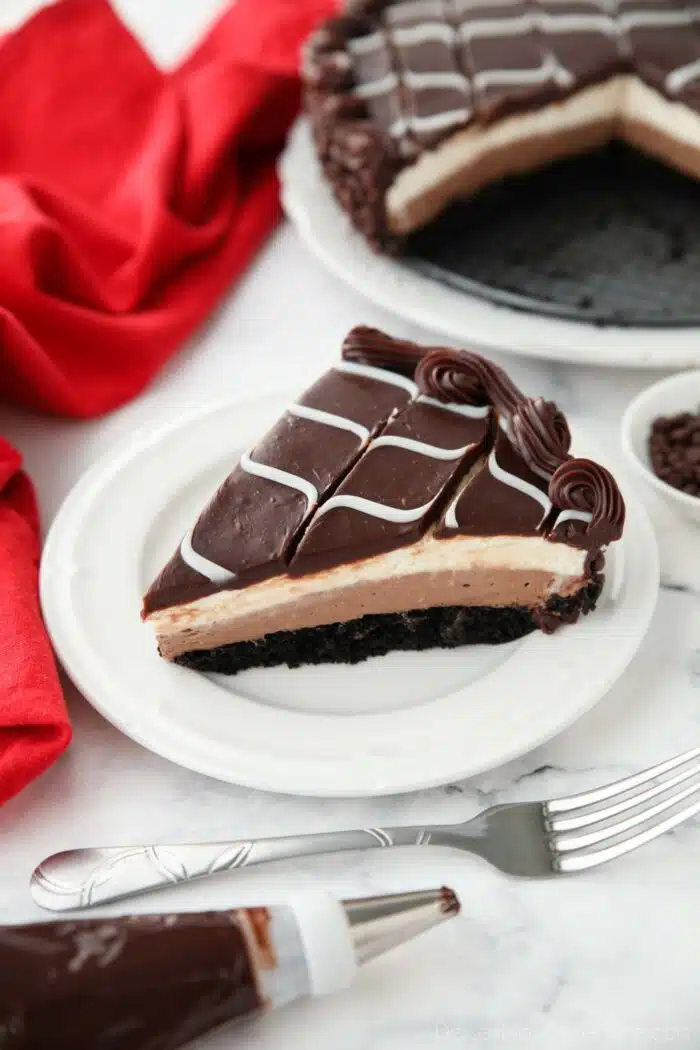
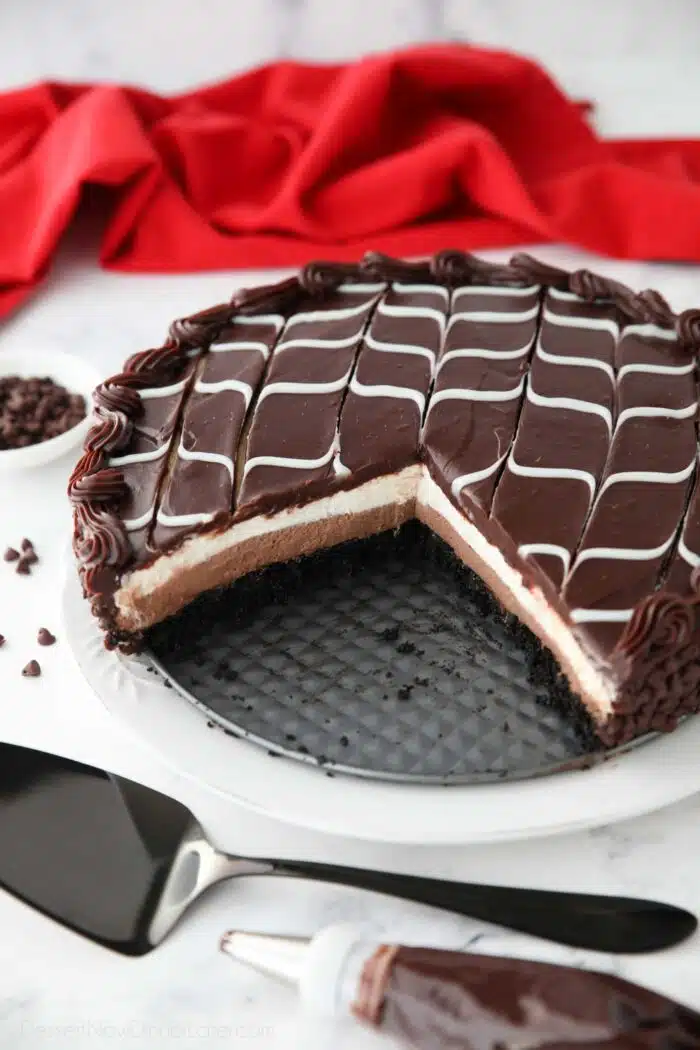
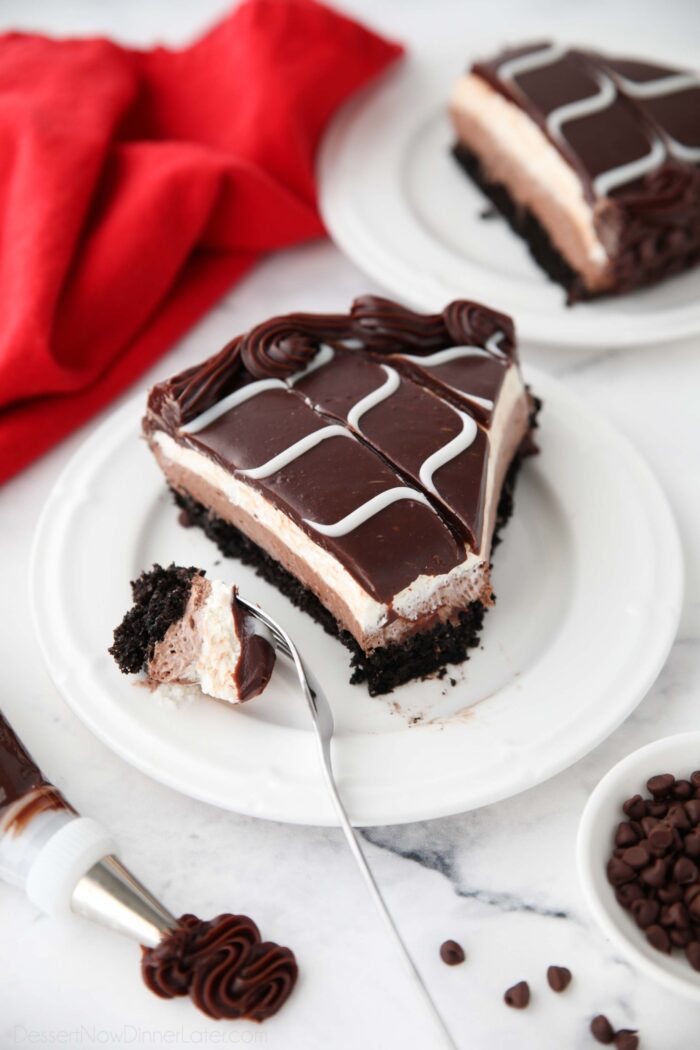
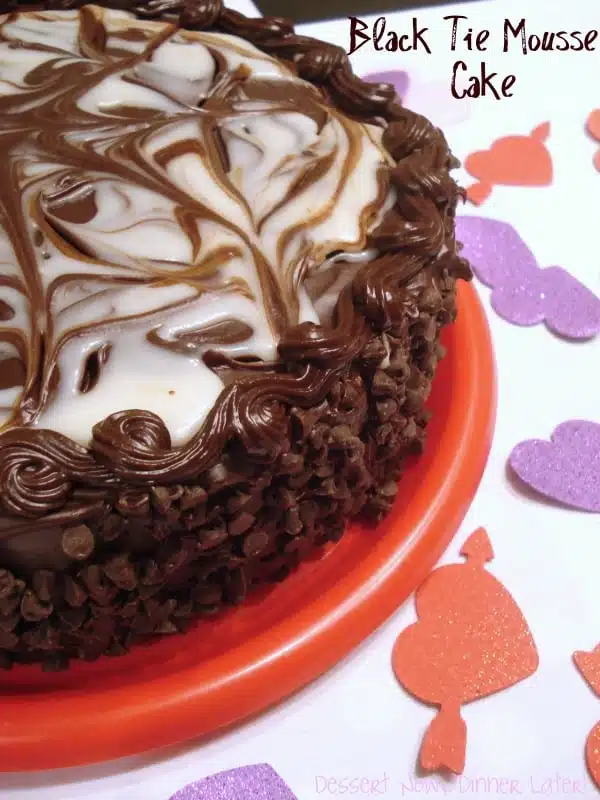
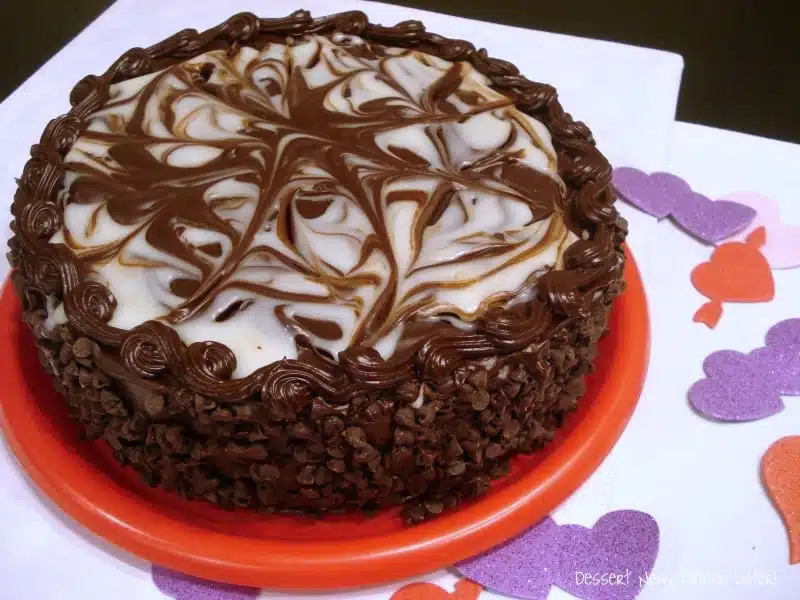
Black Tie Mousse Cake
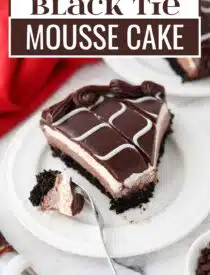
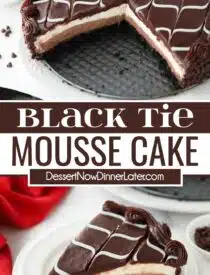
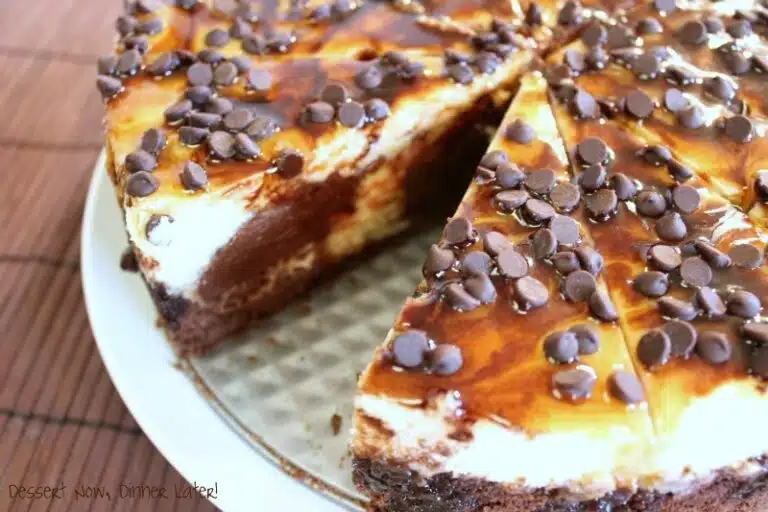
This copycat Olive Garden Black Tie Mousse Cake is beautiful with rich layers of chocolate cake, no bake chocolate cheesecake, and vanilla mousse covered in smooth ganache and mini chocolate chips.
Make it a whole meal! Start with salad or soup by making homemade Olive Garden Salad Dressing, Zuppa Toscana or Chicken and Gnocchi Soup. Don’t forget the Olive Garden Breadsticks and some pasta like this alteration of Steak Gorgonzola Alfredo.
What is Black Tie Mousse Cake?
When my husband and I go to Olive Garden and haven’t eaten too much, we will typically share a dessert, and it is always, hands down, the Black Tie Mousse Cake.
Save This recipe
Enter your email below to get a link to this recipe emailed straight to you to save later! Plus be signed up for all new recipes.
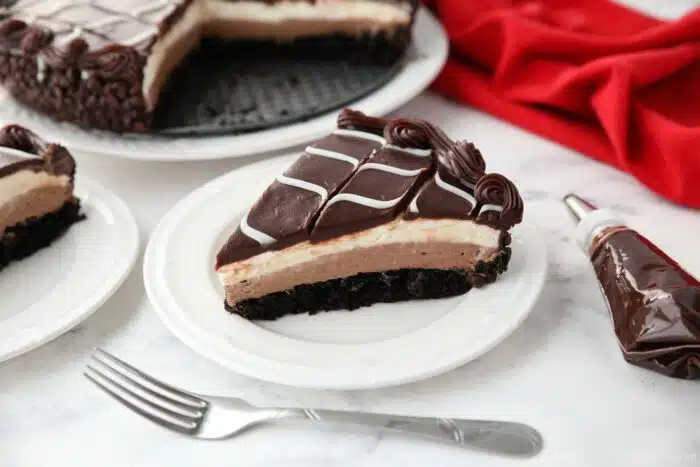
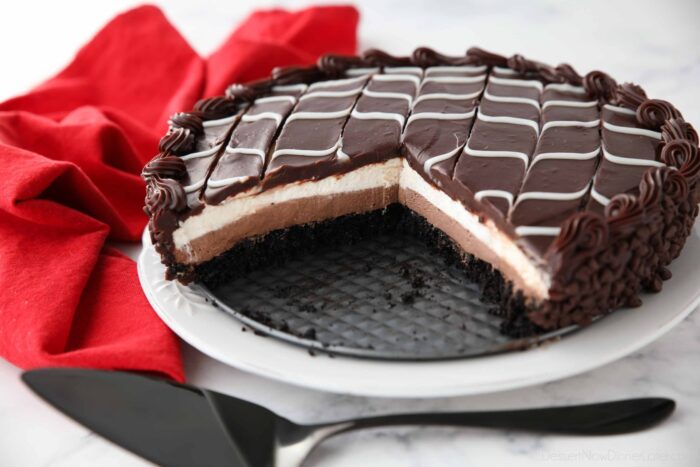
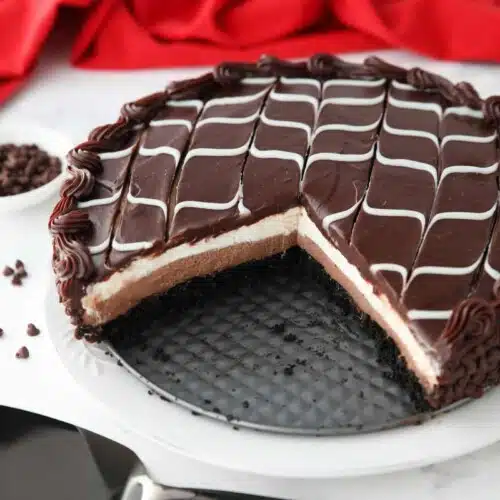
It’s an Olive Garden original, and a chocolate lover’s dream consisting of four layers:
- Moist Chocolate Cake
- Dark Chocolate Cheesecake
- Creamy Custard Mousse**
- Chocolate Ganache Frosting
It’s similar to a Tuxedo Cake or Black and White Mousse Cake. Although my recipe isn’t an exact replica of the Olive Garden dessert, it tastes similar AND it’s easier to make.
**The main difference with my recipe, is that I’ve replaced the custard with a vanilla cheesecake mousse like the no bake chocolate cheesecake layer. I think this makes it lighter and balances out the richness of the ganache and chocolate cake.
Updated Recipe
When I originally posted this recipe in February 2012, it was good, but not great, so I decided to make some changes.
I went with a different homemade chocolate cake so that it’s shorter, with more equal layers like Olive Garden’s black tie mousse cake. It’s also more moist than the recipe I used previously.
I also added gelatin to the no bake cheesecake layers for that whipped mousse texture and to stabilize the cake without freezing it. The results were even better than expected!
Why choose this Black Tie Mousse Cake recipe?
Here’s a few more reasons to make this recipe:
- Step-by-Step Photo Instructions: I’m going to show you exactly how to make this black tie mousse cake with a full photo tutorial, so that I can help you through every step.
- Simplified Fillings: No custard, and tempering eggs. Cocoa powder in place of melting chocolate. Less technicalities and less messes.
- Beautiful and Delicious: Although this may be a more intermediate-advanced level dessert and slightly time consuming, it’s absolutely stunning and worth every effort and every bite!
Make the Chocolate Cake Base
The chocolate cake base is a greatly reduced recipe altered from Hershey’s. I typically use half regular cocoa and half dark cocoa to make it darker in color and taste. But all natural unsweetened cocoa powder is fine too.
*NOTE: Full ingredient amounts and instructions are in the printable recipe card at the bottom of the post.
- Preheat oven to 350˚F. Lightly grease a 9-inch springform pan with cooking spray. Set aside.
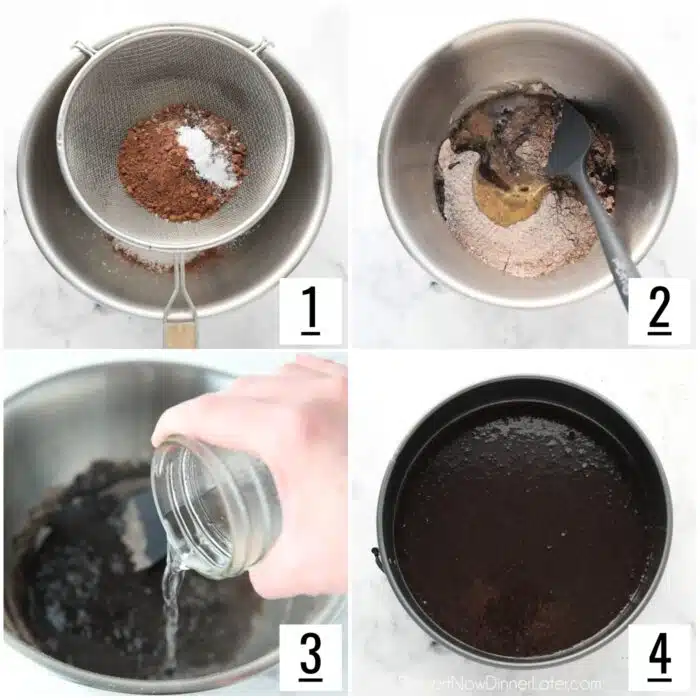
- Sift together the sugar, flour, cocoa, baking powder, baking soda, and salt into a large bowl.
- Add the egg, milk, oil, and vanilla. Stir until incorporated.
- Heat 1/4 cup of water in a glass measuring cup in the microwave until boiling (30-60 seconds). Pour boiling water into batter and mix until fully incorporated. The texture of the batter should be consistent throughout. Batter will be thin, but shouldn’t have watery spots.
- Pour batter into the prepared pan. Bake chocolate cake at 350˚F for 15-18 minutes, or until a toothpick comes out clean or with a few moist crumbs when inserted in the center of the cake. Remove from oven and place the pan in the freezer to chill the cake.
Make the Vanilla and Chocolate Cheesecake Fillings
It’s easiest to break up the fillings with steps to make the two cream cheese mixtures, and then the steps to make and add the stabilized whipped cream to create mousse. This results in less steps and less dishes. Win-win!
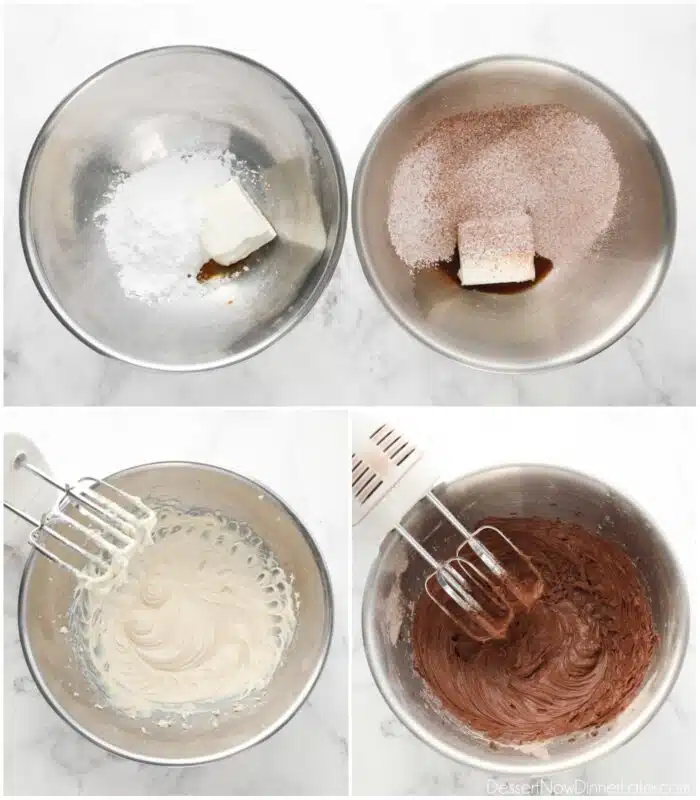
- VANILLA CREAM CHEESE: Place the cream cheese, powdered sugar, salt, and vanilla in a large bowl. Beat together with an electric hand mixer until smooth. Set aside. (No need to clean the beaters. Use them for the next step.)
- CHOCOLATE CREAM CHEESE: Place the cream cheese in a large bowl. Sift the powdered sugar and cocoa powder over the top of the cream cheese. Add the salt and vanilla. Beat together with an electric hand mixer until smooth. Set aside. (Now clean the beaters for a future step.)
Make the Stabilized Whipped Cream
This is basically whipped cream frosting without the powdered sugar because it is already mixed in with the two cream cheeses. The gelatin stabilizes the whipped cream (makes it sturdy so it won’t deflate) and boosts the airy whipped texture, which is what you want in mousse.
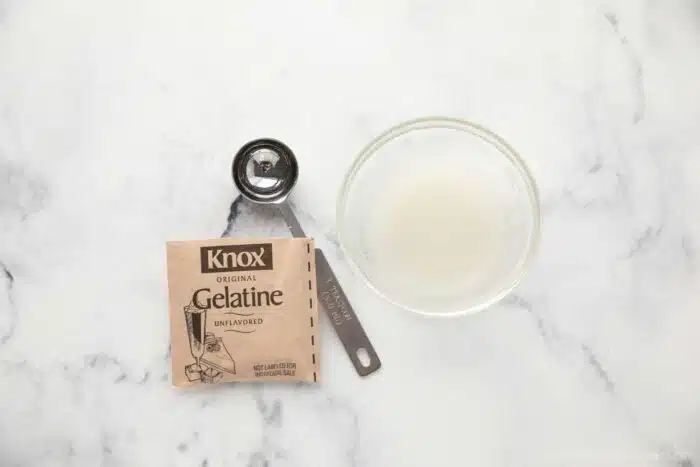
- In a small microwaveable bowl, stir together the unflavored gelatin and cold water. Set aside for 5 minutes to absorb and solidify.
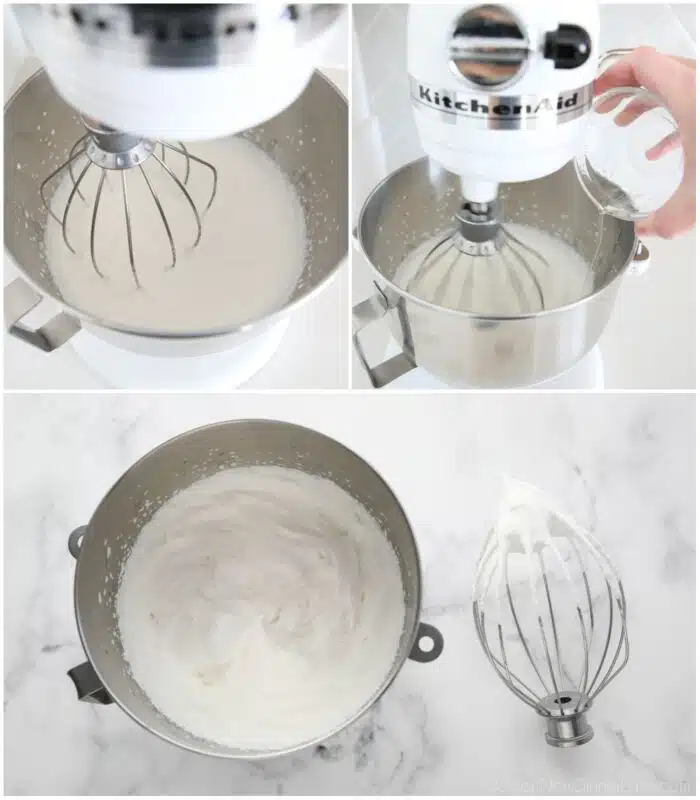
- Place cold heavy cream in the bowl of a stand mixer. Using the whisk attachment, beat until mixture is thickened, but not quite soft peaks.
- Nuke gelatin in microwave for 10 seconds to melt it. Stir until smooth and no longer foggy/grainy; mixture will start to look more transparent/clear. Slowly drizzle the liquid gelatin into the cream while the mixer is running on low speed. (It’s important to do this slowly to avoid lumps.)
- Slowly increase speed to medium-high and whip until stiff peaks form. (Just until it starts to look thick and leaves trails from the whisk. Do not over-mix or it will curdle and turn into butter. Keep a close eye on it.)
Add Whipped Cream to make Vanilla and Chocolate Mousse
The only difference between this and no-bake cheesecake is that it has gelatin in the whipped cream to make it mousse-like.
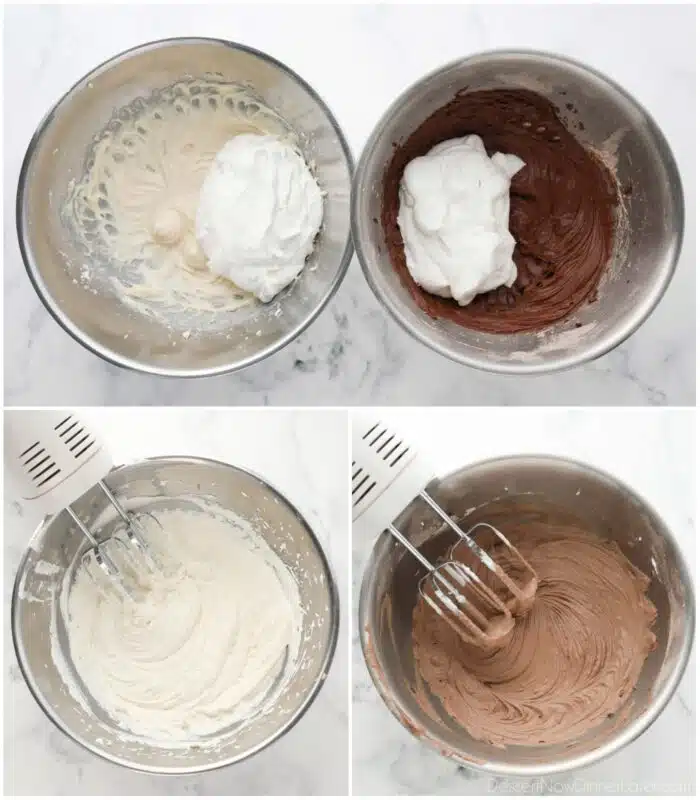
- Divide the stabilized whipped cream, placing half in the vanilla cream cheese mixture and half in the chocolate cream cheese mixture.
- Use the electric hand mixer to beat the vanilla mixture first. Then the chocolate. No need to clean the beaters in-between.
Assemble the Layers
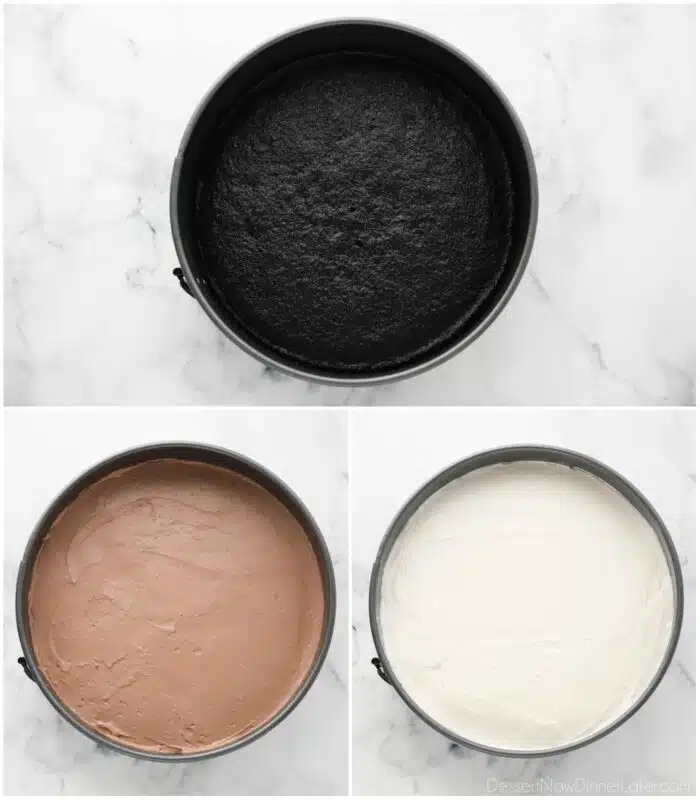
- Remove the chocolate cake from the freezer.
- Spread the chocolate mousse mixture evenly over the frozen chocolate cake.
- Then dollop the vanilla mousse over the top of the chocolate mousse and carefully spread even. Cover the pan with plastic wrap (try not to let it touch the top) and chill in the fridge for a minimum of 1 hour.
Make the Ganaches
- After the mousse has set, carefully remove the edge of the springform pan, but keep the cake on the base and place it back in the fridge.
- Place the semi-sweet and white chocolate chips into two separate bowls.
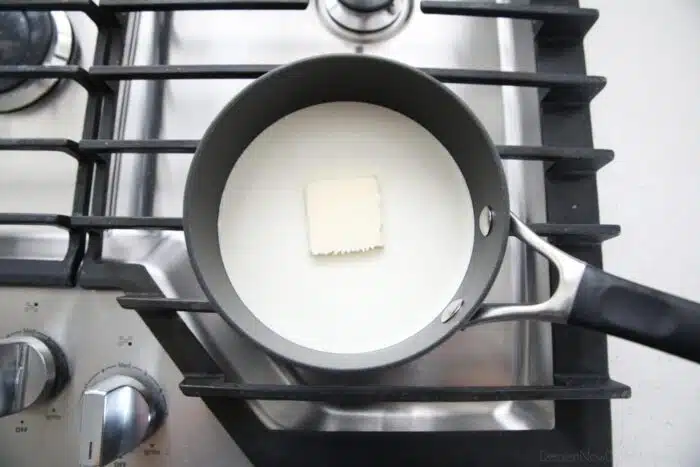
- In a small saucepan on LOW, heat heavy cream and butter until it just comes to a boil. Stir the mixture to make sure the butter is completely melted.
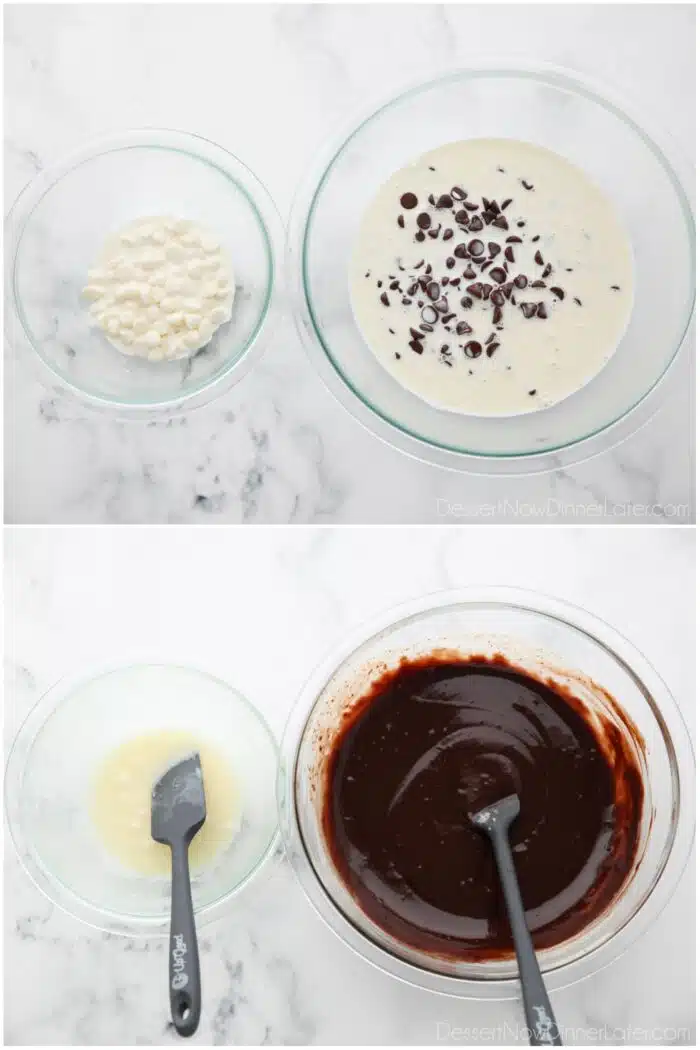
- Measure 2 Tbsp of the cream/butter mixture and put it on top of the white chocolate chips. Pour the remaining butter/cream mixture over the semi-sweet chocolate chips.
- Let the cream melt the chocolate chips and then stir them up in their separate bowls. Let the ganaches cool slightly until spreading consistency.
Set aside 1/2 cup of the semi-sweet chocolate ganache, and place the white chocolate ganache in a piping bag, but wait to cut the tip. (Forgot this photo.)
Frost with Chocolate Ganache
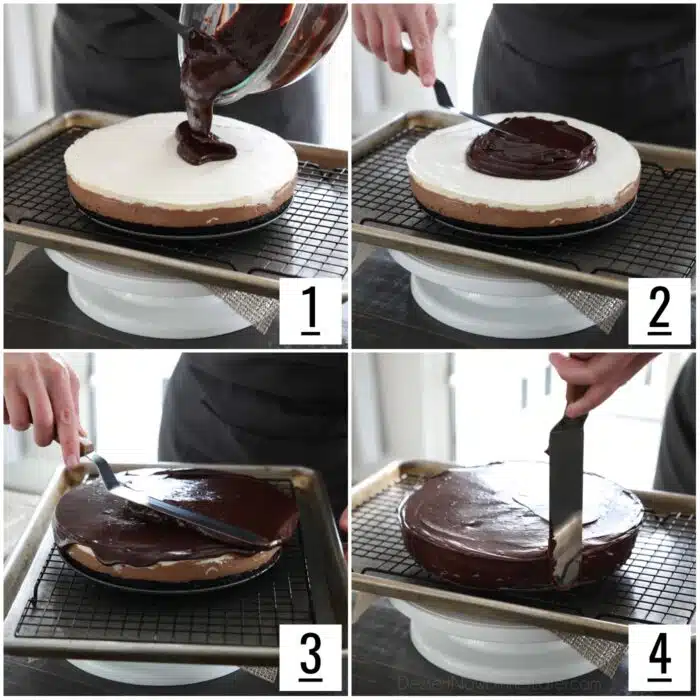
- Place a cooling rack inside of a cookie sheet and set the cake on top of the cooling rack. (The ganache that falls off the cake will be caught in the cookie sheet underneath the cooling rack.) Pour the semi-sweet chocolate ganache over the top of the cake
- Spread evenly with an offset spatula.
- Allow the chocolate ganache to drip over the edges.
- Smooth the ganache around the edges with your spatula.
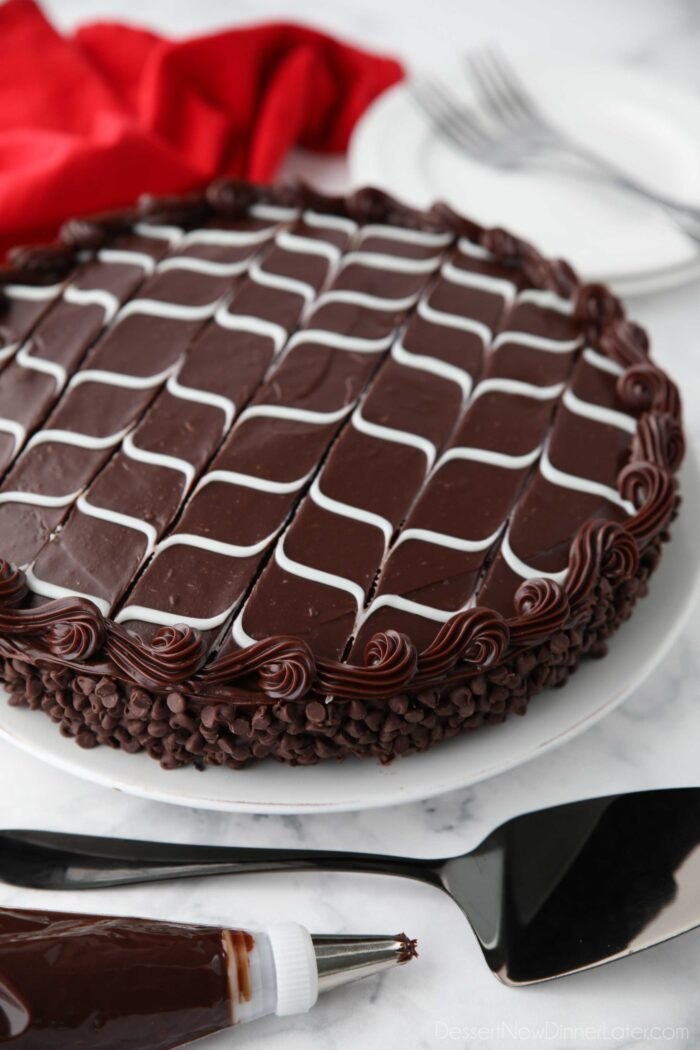
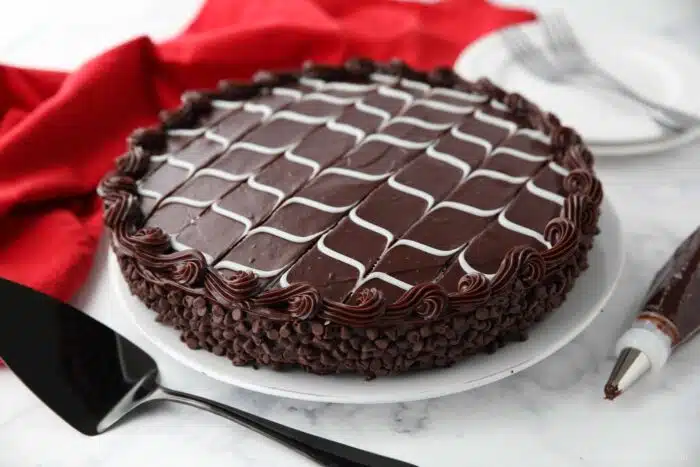
Decorate the Black Tie Mousse Cake
Olive Garden’s Black Tie Mousse Cake’s added appeal is from the pattern of dark and white ganaches weaved together on top. This is how you do it.
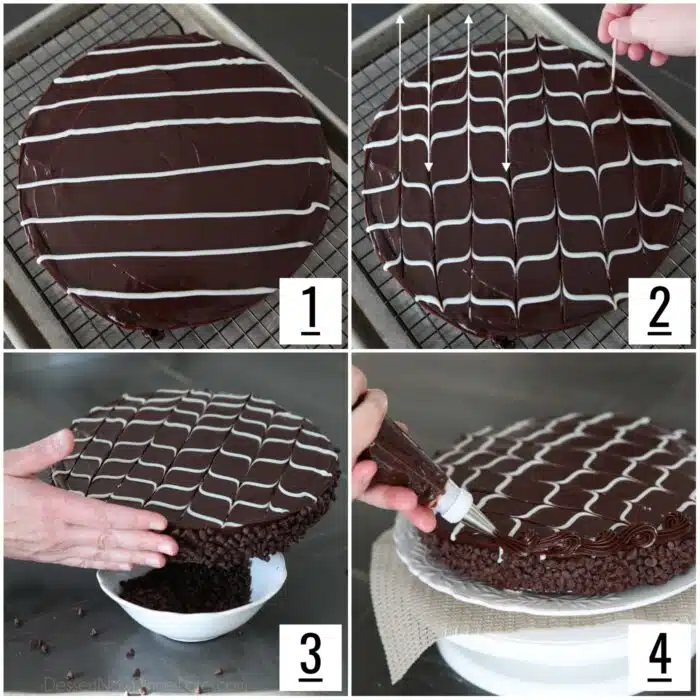
- Once the cake is coated, cut the tip of the bag of white chocolate ganache and pipe horizontal stripes on top of the cake about 1-inch or so apart.
- Immediately use a toothpick to gently drag lines through the ganache across the full cake in vertical motions, alternating going up and down across the cake.
- Quickly press the mini chocolate chips onto the side of the cake while the ganache is still wet.
- Place the semi-sweet ganache that was set aside into a piping bag fitted with a coupler and Wilton 21 open star piping tip. Pipe a border around the edge. I piped a reverse shell pattern. Here’s a helpful tutorial on YouTube.
Chill Until Set
Once fully decorated, store the cake in the fridge until the ganache has set completely, at least 15-20 minutes or more, as desired.
Storing and Freezing
Once the ganache has set, you can lightly cover the black tie mousse cake with plastic wrap and store it in the fridge for up to 5-7 days.
To Freeze: Freeze the cake unwrapped for 1 hour. Then wrap the cake with 2 layers of plastic wrap and 1 layer of foil. Freeze for up to 3 months. Remove the foil and one layer of plastic wrap, then thaw in the refrigerator overnight.
How to Slice Mousse Cake
You don’t want to go to all that trouble and ruin the appeal of this beautiful cake with messy slices.
- Make sure the cake is cold when you are about to cut it.
- Rinse a sharp chef’s knife under HOT water on both sides of the blade until the knife is hot to the touch.
- Dry it off with a towel.
- Line up the pointed edge of the knife with the very center of the cake and press straight down into the cake until you reach the bottom. Then gently pull the knife towards you, dragging the blade along the plate. Do NOT wiggle the knife, but use a firm singular motion.
- Rinse, dry, and repeat after EVERY cut.
It sounds tedious, but if you want to see all the layers and you spent all this time making the cake beautiful, you might as well follow through with making every slice clean and crisp.
WARNING: Using a cold knife might press the ganache down, smashing the layers of mousse, and squeezing them out of the cake. You don’t want that!
I know this is a possibility because as I was scooping my slice with a cold fork, the mousses started to squeeze outwards. The ganache just has a heavier density than the lighter layers of mousse below it. MORAL OF THE STORY: A hot knife will slice through the cake without smashing the layers.
You’re going to love this rich layered cake with all of it’s fun flavors and textures. It’s perfect for special occasions and holidays like Valentine’s Day.
Black Tie Mousse Cake
Ingredients
Chocolate Cake
- ½ cup (100 g) granulated sugar
- ½ cup (60 g) all-purpose flour, stir, spoon, and level when measuring
- ¼ cup (20 g) unsweetened cocoa powder
- ½ teaspoon baking powder
- ¼ teaspoon baking soda
- ¼ teaspoon salt
- ½ large egg, about 2 Tbsp, whisked
- ¼ cup (59 ml) milk
- 3 Tablespoons oil, (canola/vegetable)
- ½ teaspoon vanilla extract
- ¼ cup (59 ml) boiling water
Vanilla Cream Cheese
- 4 ounces (113 g) cream cheese, room temperature
- ¾ cup (90 g) powdered sugar
- 1 pinch salt
- ½ teaspoon vanilla extract
Chocolate Cream Cheese
- 4 ounces (113 g) cream cheese, room temperature
- ¾ cup (90 g) powdered sugar
- 1/4 cup (20 g) unsweetened cocoa powder
- 1 pinch salt
- ½ teaspoon vanilla extract
Stabilized Whipped Cream (to make mousses)
- 1 teaspoon unflavored gelatin
- 4 teaspoons cold water
- 1 ½ cups (355 ml) heavy whipping cream, cold
Ganaches and Decorations:
- 1 cup (237 ml) heavy whipping cream
- 2 Tbsp unsalted butter
- 12 ounces (340 g) semi-sweet chocolate chips, about 2 cups
- ¼ cup (43 g) white chocolate chips
- ½ cup (85 g) mini chocolate chips
Equipment
Instructions
- Preheat oven to 350˚F. Lightly grease a 9-inch springform pan with cooking spray. Set aside.
- CHOCOLATE CAKE: Sift together the sugar, flour, cocoa, baking powder, baking soda, and salt into a large bowl.
- Add the egg, milk, oil, and vanilla. Stir until incorporated. Heat 1/4 cup of water in a glass measuring cup in the microwave until boiling (30-60 seconds). Pour boiling water into batter and mix until fully incorporated. The texture of the batter should be consistent throughout. Batter will be thin, but shouldn't have watery spots. Pour batter into the prepared pan.
- Bake chocolate cake at 350˚F for 15-18 minutes, or until a toothpick comes out clean or with a few moist crumbs when inserted in the center of the cake. Remove from oven and place the pan in the freezer to chill the cake.
- VANILLA CREAM CHEESE: Place the cream cheese, powdered sugar, salt, and vanilla in a large bowl. Beat together with an electric hand mixer until smooth. Set aside. (No need to clean the beaters. Use them for the next step.)
- CHOCOLATE CREAM CHEESE: Place the cream cheese in a large bowl. Sift the powdered sugar and cocoa powder over the top of the cream cheese. Add the salt and vanilla. Beat together with an electric hand mixer until smooth. Set aside. (Now clean the beaters for a future step.)
- STABILIZED WHIPPED CREAM: In a small microwaveable bowl, stir together the unflavored gelatin and cold water. Set aside for 5 minutes to absorb and solidify.
- Place cold heavy cream in the bowl of a stand mixer. Using the whisk attachment, beat until mixture is thickened, but not quite soft peaks.
- Nuke gelatin in microwave for 10 seconds to melt it. Stir until smooth and no longer foggy/grainy; mixture will start to look more transparent/clear. Slowly drizzle the liquid gelatin into the cream while the mixer is running on low speed. (It’s important to do this slowly to avoid lumps.)
- Slowly increase speed to medium-high and whip until stiff peaks form. (Just until it starts to look thick and leaves trails from the whisk. Do not over-mix or it will curdle and turn into butter. Keep a close eye on it.)
- MAKE MOUSSES: Divide the stabilized whipped cream, placing half in the vanilla cream cheese mixture and half in the chocolate cream cheese mixture. Use the electric hand mixer to beat the vanilla mixture first. Then the chocolate. No need to clean the beaters in-between.
- ASSEMBLE LAYERS: Spread the chocolate mousse mixture evenly over the frozen chocolate cake. Then dollop the vanilla mousse over the top of the chocolate mousse and carefully spread even. Cover the pan with plastic wrap (try not to let it touch the top) and chill in the fridge for a minimum of 1 hour.
- After the mousse has set, carefully remove the edge of the springform pan, but keep the cake on the base and place it back in the fridge.
- MAKE GANACHES: Place the semi-sweet and white chocolate chips into two separate bowls. In a small saucepan on LOW, heat heavy cream and butter until it just comes to a boil. Stir the mixture to make sure the butter is completely melted.
- Measure 2 Tbsp of the cream/butter mixture and put it on top of the white chocolate chips. Pour the remaining butter/cream mixture over the semi-sweet chocolate chips. Let the cream melt the chocolate chips and then stir them up in their separate bowls. Let the ganaches cool slightly until spreading consistency. Set aside 1/2 cup of the semi-sweet chocolate ganache, and place the white chocolate ganache in a piping bag, but wait to cut the tip.
- DECORATE CAKE: Place a cooling rack inside of a cookie sheet and set the cake on top of the cooling rack. (The ganache that falls off the cake will be caught in the cookie sheet underneath the cooling rack.) Pour the semi-sweet chocolate ganache over the top of the cake; spread evenly with an offset spatula. When the chocolate drips over the edges, smooth the ganache with your spatula.
- Once the cake is coated, cut the tip of the bag of white chocolate ganache and pipe horizontal stripes on top of the cake about 1-inch or so apart. Immediately use a toothpick to gently drag lines through the ganache across the full cake in vertical motions, alternating going up and down across the cake. (*See photo tutorial in post.)
- Quickly press the mini chocolate chips onto the side of the cake while the ganache is still wet. Place the semi-sweet ganache that was set aside into a piping bag fitted with a coupler and Wilton 21 open star piping tip. Pipe a border around the edge. I piped a reverse shell pattern.
- Once fully decorated, store the cake in the fridge until the ganache has set completely, at least 15-20 minutes or more, as desired.
- When ready to serve, cut cake with a hot, dry knife. Rinsing the knife in hot water and drying the knife between cuts for crisp slices.
Video
Notes
- Once the ganache has set, you can lightly cover the black tie mousse cake with plastic wrap and store it in the fridge for up to 5-7 days.
- To Freeze: Freeze the cake unwrapped for 1 hour. Then wrap the cake with 2 layers of plastic wrap and 1 layer of foil. Freeze for up to 3 months. Remove the foil and one layer of plastic wrap, then thaw in the refrigerator overnight.
Nutrition
Did you make this?
Don’t forget to leave a rating below and make sure to follow on Pinterest and Instagram for more!
*Originally published 2/1/2012. Post updated January 2024.


ok i wish i could add a pic. turned out very good,my daughter did the last step to decorate for me. i froze all three layers until we decorated it then just the frig. the only problem i had , there were some pieces of the solid gelaten in the mousse. not sure what i did wrong. i followed the recipe to a T. i made for a ladies dinner and everyone loved it.
So glad you enjoyed the cake Joyce! Gelatin can be tricky to incorporate into cream. If it’s too hot then it can melt the cream’s fat. If it’s too cold then it can instantly harden into jelly as soon as it hits the cold cream. It can take some experience to learn the right temperature to prevent that, but I’m glad everyone still loved it!
I want to make this for a family gathering and need larger and not so tall cake. Can I double and bake in large rectangular pan (not springform), and keep it in the pan for serving?
I haven’t done it myself, but I think it would work out well with the 9×13-inch pan if you doubled the recipe. It might be better to 1.5x the recipe if you want to keep the layers thinner.
I searched high and low for a recipe for Black Tie Mousse Cake that was simple and this came out very good. It reminded me more of a full cheesecake rather than a ‘mousse’ cake but that’s no issue – I do recommend that you freeze it JUST as the directions say, until it is served. Mine thawed a bit before we got to cut into it and it was very soft and just barely held together. Tasted great, looked beautiful and was so so rich! Thanks for the recipe!
Thanks Jeni! I’ve debated on re-doing this to a real ‘mousse’ cake, but I’m glad you enjoyed this variation!
Canu send as more moose cake recipes please l was asked to make on for March 13
Thank you very much. This cake days to keep it frozen to you serve it, is this something that we need to do with any mouse cake, just curious thank you
This is the only mousse cake recipe I have. You can freeze the cake, but it is not necessary. You can keep it refrigerated for up to 1 week.
My sister mentioned that she wanted a “tuxedo” cake and this is the kind of cake she meant. She figured if it happened, we would have bought one from the store. Not even close 😊. I did a Google search for something that looked right and this one jumped out. So I started making it and got to the gnaches before I realized that this cake was meant to stay frozen 😲 I finished swirling the top and shoved it back in before things could go sideways! Never actually froze, it just moved slower when it was cold, haha!
Made a great surprise for her sweet 16.
I’m glad it worked out! Thanks for your comment!
Made this for my daughters birthday. I had a few issues but all in all it was a fantastic cake and so much fun making it!
I’m glad you got it to work out! Thanks for stopping by to leave your review!
Just wanted to say another thank you. I now have multiple requests to make this cake for others. This has to have been the best cake ever. I was initially concerned because my whipped mix never got to stiff peaks, but the end product was phenomenal. It not only looked beautiful but the balance between chocolate and non chocolate was perfect. Looking forward to trying more of the recipes on your site!
Oh wow! That’s so great! Thanks Natalie! I hope you find more recipes to love!
I’ve made your recipe several times, always a hit! Thanks for sharing 🙂
I’m so glad to hear that! Thanks for coming back to share your review!