
Mermaid Tail Cupcake Cake
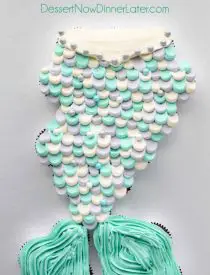
This Mermaid Tail Cupcake Cake is the perfect girls birthday cake, and this tutorial shows you exactly how to make it. Cupcakes pull apart for easy serving. (No cake to cut!) Plus extra mermaid birthday party ideas!
Mermaid birthday parties are every little girl’s dream. It also makes a super cute baby shower theme.
So naturally when my daughter turned eight last month we threw her the cutest mermaid birthday party. Being a former cake decorator, I wanted to make a mermaid cake that was cute, but simple and easy to serve.
Save This recipe
Enter your email below to get a link to this recipe emailed straight to you to save later! Plus be signed up for all new recipes.
This mermaid tail cupcake cake is a little time intensive because of all the scales, but you’ll be surprised at how easy it actually is.
I’m also sharing all of the mermaid party ideas that we did like party bags and favors, mermaid decorations, games, and of course mermaid themed food. Scroll down past the cupcake tutorial for those ideas.
Mermaid Tail Cupcake Cake Template
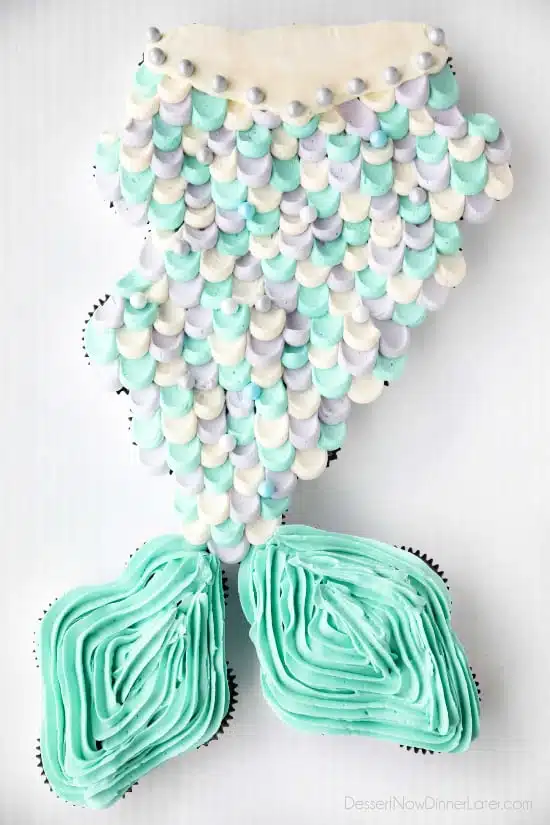
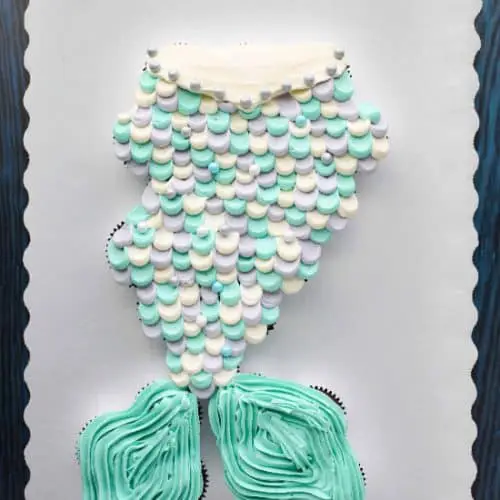
There are 24 cupcakes in this mermaid tail cupcake cake template. A boxed cake mix will give you exactly 24 cupcakes, but feel free to make homemade cupcakes like funfetti or chocolate as well.
For the wrappers, I chose a double lined silver cupcake wrapper (to hide the brown chocolate cupcakes). Gold would be really pretty too. Any color wrapper should work on a lighter cupcake.
I purchased a full-size sheet cake board and box from a grocery store bakery for my cupcake cake.
TIP: Put double sided tape on the bottom of the cupcake wrappers to attach the cupcakes to the board so they will stay close together and not move while frosting them.

How to Make a Mermaid Tail Pull Apart Cake
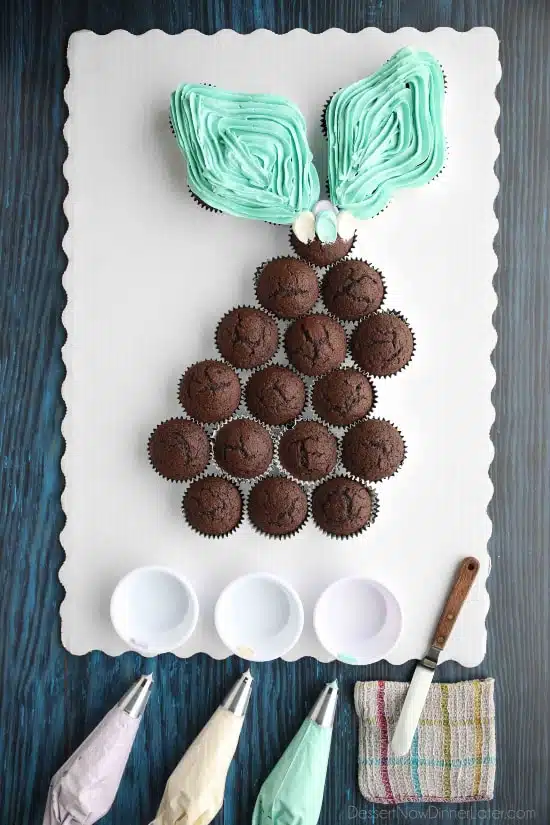
For this mermaid tail cupcake cake, you will work from the bottom fins to the top. (Make sure to grab my new favorite buttercream frosting recipe below this tutorial.)
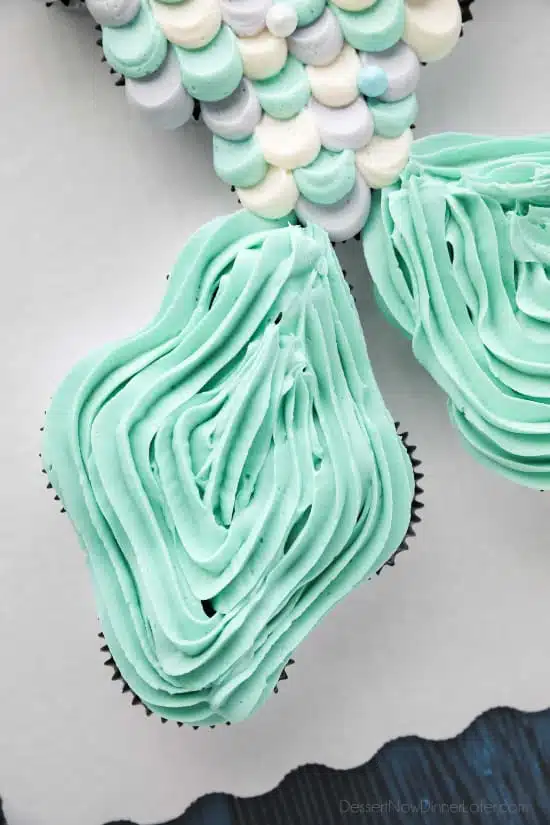
Pipe the fins with a slightly opened Wilton 2D (large flower/star) tip. Pipe continuously outlining the edges first, and working your way towards the center.
TIP: Make sure the frosting bag is full before piping each fin, to help prevent air bubbles and having to lift the tip to start again.
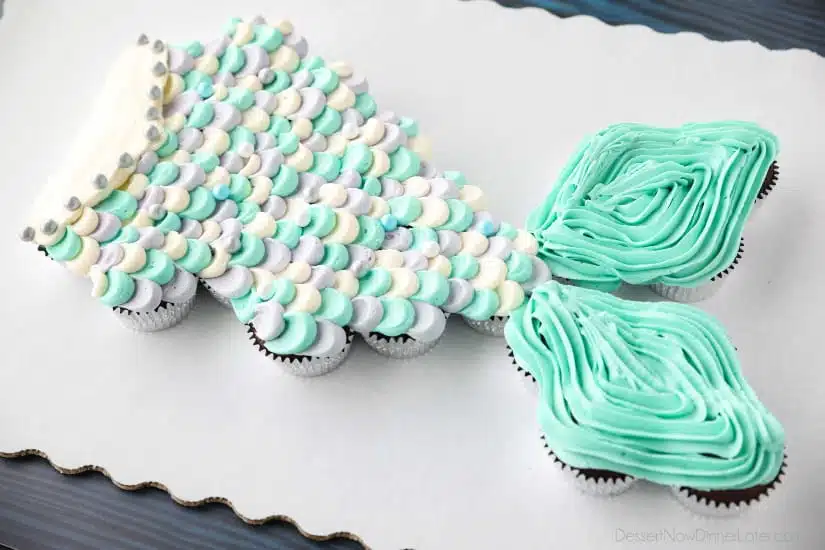
How to Pipe the Mermaid Tail Scales
Choose three colored frostings for the mermaid tail scales. Flip the board upside down so the fins are at the top. Place each color into a piping bag fitted with a Wilton 1A or larger round tip.
You will also need a small offset spatula, and a clean, damp washcloth for wiping the spatula between colors.
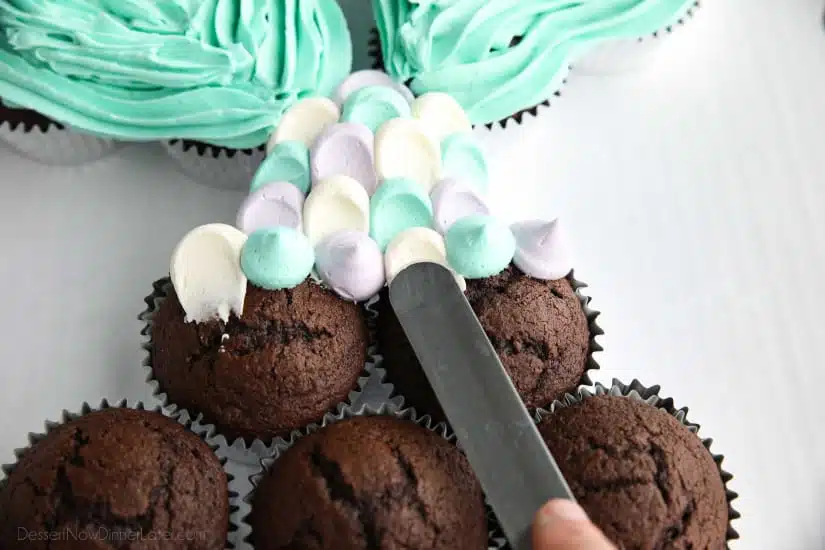
Alternate piping colored dots by squeezing the frosting directly on top of the cupcake and lifting the bag straight up. Try not to have the same two colors touching. You may need to pipe frosting extra thick between any cupcake gaps.
Using the small offset spatula, gently press the tips of the dots down slightly and then pull the spatula towards the unfrosted cupcakes. This creates the scales. Scrape excess frosting into 3 small bowls – one for each color. Wipe the spatula clean with the damp cloth between colors. (This is the most time intensive part.)
TIP: Pull all of the same colors in the row, then wipe the spatula clean and do a different color, then wipe the spatula and do the last color.
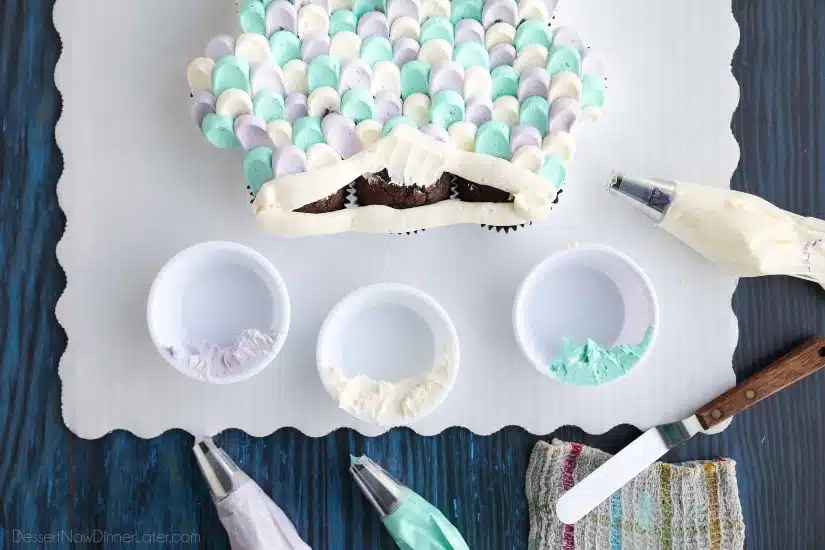
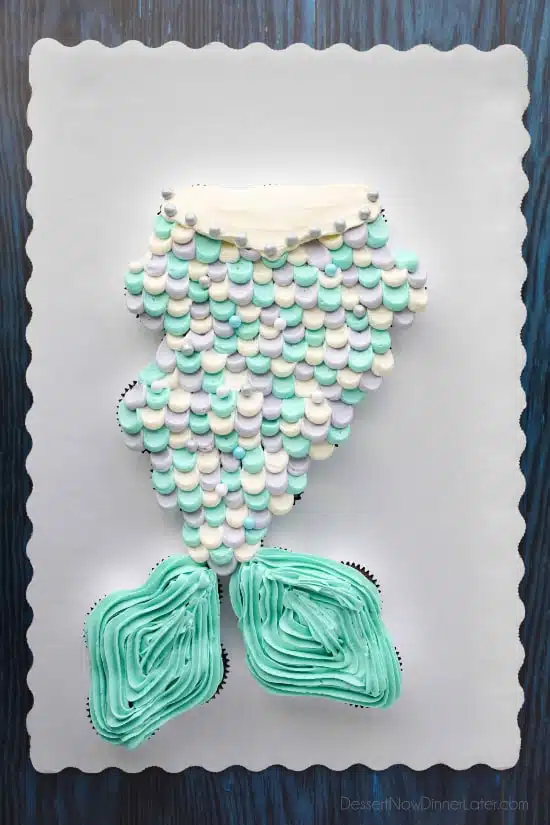
To finish the mermaid tail cupcake cake, I made a v-shaped waistband at the top inspired by this cake I saw on Pinterest.
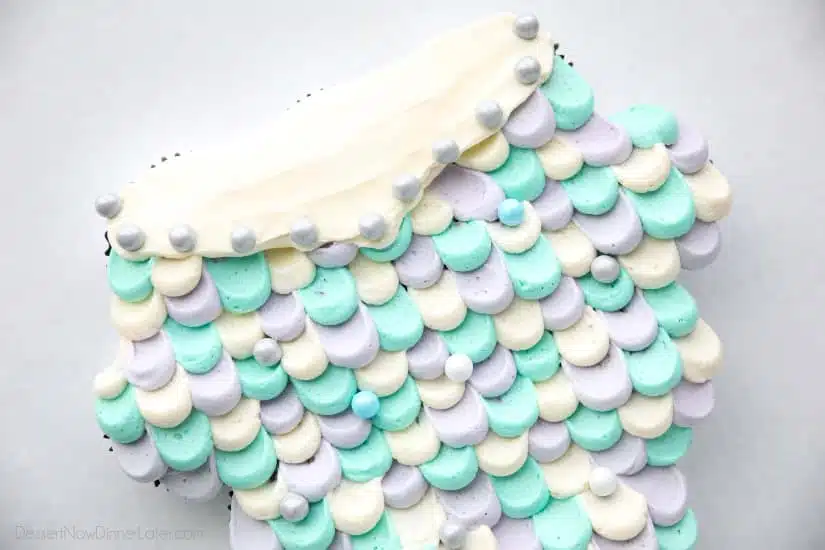
Once the scales get close to the top of the mermaid tail, you can use any of the three colors to pipe an outline for the waistband. I used white because it was the color I had the most left over. Squeeze more frosting into the center to fill it in and then smooth it out with the offset spatula.
TIP: Using a slightly wet spatula will help smooth out most bumps and lines. Use chocolate pearls to decorate the waistband and random scales along the mermaid tail.
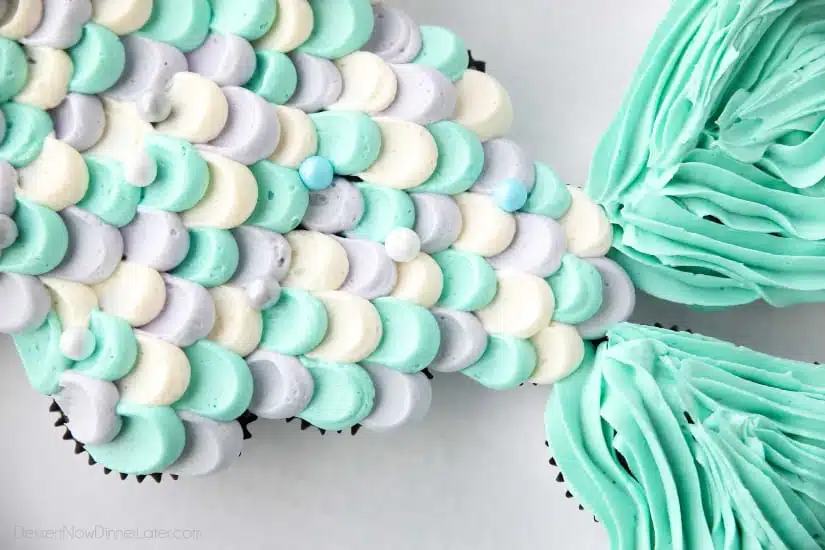
Voila! This mermaid tail cupcake cake is picture perfect and ready for your party! To store the cake, scoot the board onto the bottom of a (disassembled) cardboard cake box, and then assemble your box around the cake.
Mermaid Tail Cupcake Cake
Ingredients
- 15.25 oz (432 g) box cake mix + ingredients to make cake, (oil, water, eggs)
- 4 disposable piping bags, (12-inches or larger)
- 1 Wilton 2D tip
- 3 Wilton 1A tips
- Small offset spatula
- Clean damp washcloth
- 3 small bowls to scrape excess frosting
- Chocolate pearls for decorating
Vanilla Buttercream Frosting
- 2 cups (452 g) unsalted butter, room temperature
- 1/2 tsp salt
- 6 cups (720 g) powdered sugar
- 6 Tbsp heavy cream
- 2 tsp vanilla extract
- Food Coloring Paste, (2-3 colors of choice – I did turquoise [blue/green mixed together] and purple)
Instructions
- For the cupcakes: Mix and bake cupcakes in paper baking cups — I used double-lined silver baking cups to hide the brown of the chocolate cake. Bake according to package directions. (Cupcakes typically bake at 350˚F for 19-23 minutes.) Make sure to divide batter evenly for 24 cupcakes.
- For the frosting: With an electric mixer, beat the butter with the salt until creamy. Add the powdered sugar 1/2 cup at a time, mixing completely before adding more. Repeat until all powdered sugar is added. Add heavy cream one Tablespoon at a time, then increase speed to high and beat for about 30 seconds. Add vanilla and mix until incorporated.
- Separate and color 1/2 of the frosting turquoise (or which ever color you choose for the fins and some scales).
- Color 1/4 of the frosting purple (or the color of your choice) and keep the other 1/4 of the frosting white (or the color of your choice).
- Use four disposable piping bags. Place half of the turquoise in one bag with a Wilton 2D tip. Place the turquoise, purple, and white frosting in separate bags each fitted with a Wilton 1A or larger round tip. You will also need a small offset spatula, three small bowls, and a clean, damp washcloth for wiping the spatula between colors.
- Use double-sided tape to adhere cupcakes to a full-size sheet cake board in a mermaid tail shape. (See post for template.)
- For the fins: Pipe the fins with a slightly opened Wilton 2D tip. Pipe continuously, outlining the edge first, and working your way towards the center. TIP: Make sure the frosting bag is full before piping each fin, to help prevent air bubbles and having to lift the tip to start again.
- For the scales: Flip the board upside down so the fins are at the top. Alternate piping colored dots by squeezing the frosting directly on top of the cupcake and lifting the bag straight up. Try not to have the same two colors touching. You may need to pipe frosting extra thick between any cupcake gaps.
- Using the small offset spatula, gently press the tips of the dots down slightly and then pull the spatula towards the unfrosted cupcakes. This creates the scales. Scrape excess frosting into three small bowls – one for each color. Wipe the spatula clean with the damp cloth between colors. (This is the most time intensive part.) TIP: Pull all of the same colors in the row, then wipe the spatula clean and do a different color, then wipe the spatula and do the last color.
- For the waistband: Once the scales get close to the top of the mermaid tail, you can use any of the three colors to pipe an outline for a v-shaped waistband. I used white because it was the color I had the most left over. Squeeze more frosting into the center to fill it in and then smooth it out with the offset spatula. TIP: Using a slightly wet spatula will help smooth out most bumps and lines.
- Use chocolate pearls to decorate the waistband and random scales along the mermaid tail. Scoot the cake board onto the bottom of the cardboard box, and then assemble the box around the cake. Store Mermaid Tail Cupcake Cake in the cake box until ready to eat.
Notes
Did you make this?
Don’t forget to leave a rating below and make sure to follow on Pinterest and Instagram for more!
More Mermaid Party Ideas
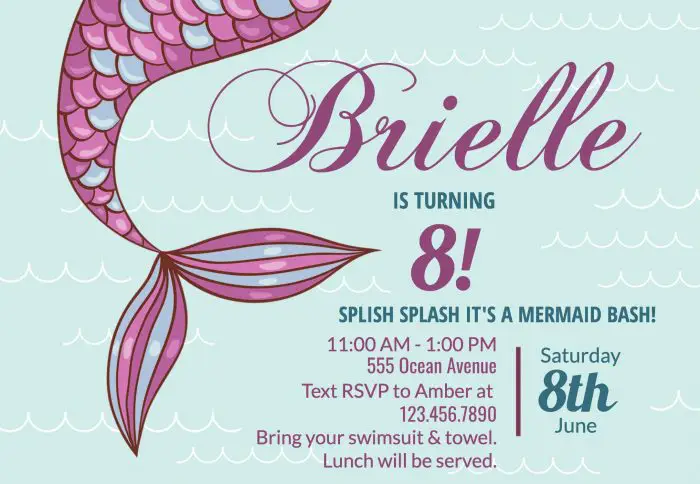
For our mermaid invitations, we used this FREE customizable Fantasy Fin mermaid invitation. It’s easy to change the information, font, and colors. Then I saved the image and ordered prints like you would photos.
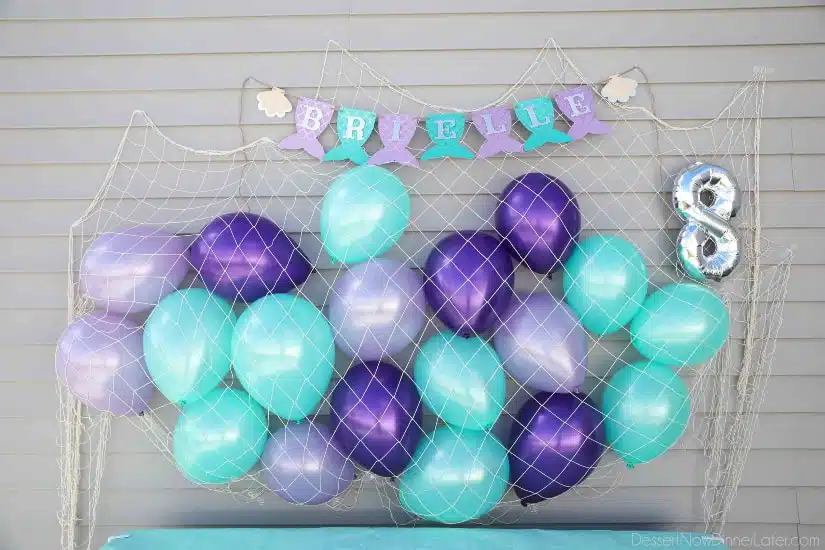
Our mermaid decorations were inspired by this photo on Pinterest. I bought a decorative fish net and balloons from a party store. It was kind of a beast to get up outside with some wind that we were having. We just used tape to hang the net and tucked the balloons inside. I also ordered this super cute Mermaid Tail Banner on etsy.
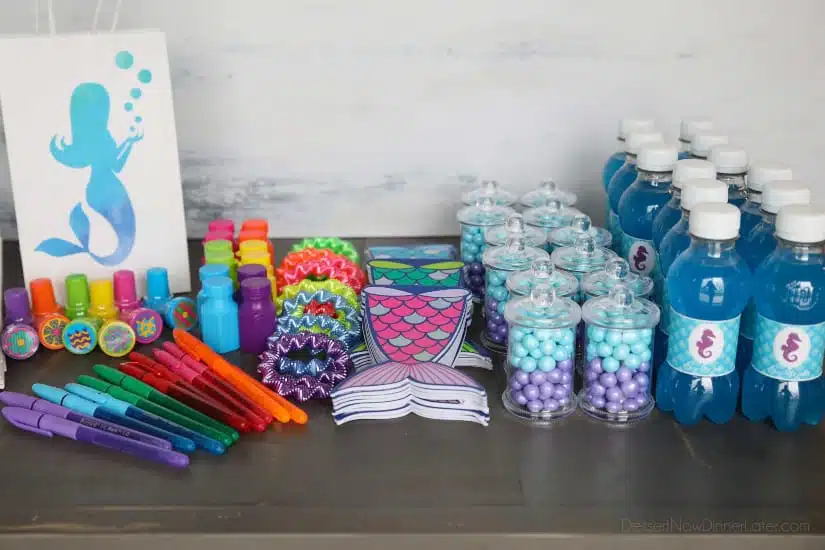
For the mermaid party favor bags, I bought plain white gift bags from the dollar store. Then I printed this FREE Mermaid Silhouette (by creating a horizontal document with two figures on one page) and glued them to the front of the bags.
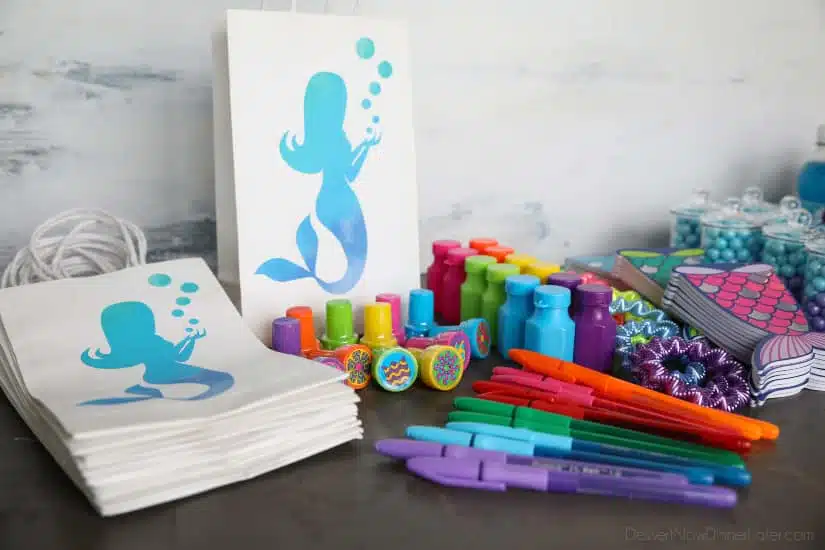
We bought rainbow colored pens, flower stampers, mini bubbles, bracelets, and mermaid tail notebooks from either the dollar store or party store.
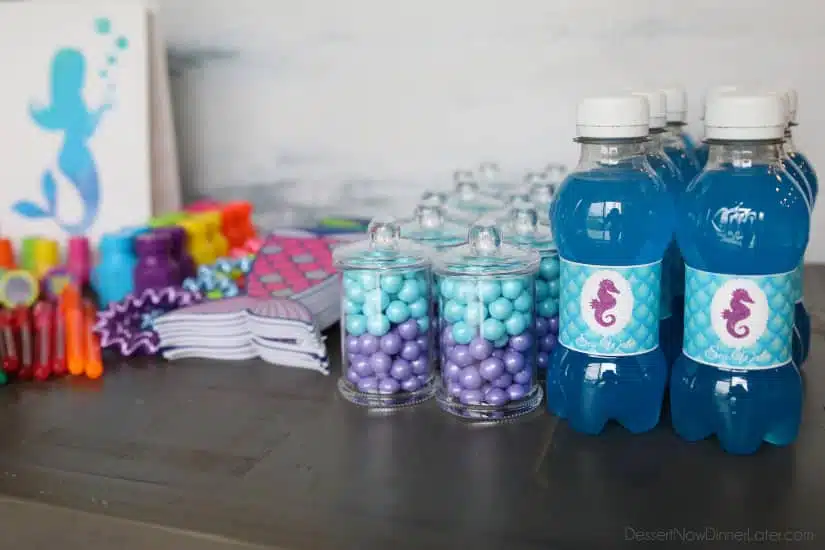
We filled mini candy jars with blue and purple colored Sixlets candy pearls and found some mini blue soda bottles at Winco Foods for “sea water.”
All of the printables for the bottles and food tags were from Mommy of a Princess, and accessed in the files of her VIP Facebook Group. I used my own fonts to edit and type them.
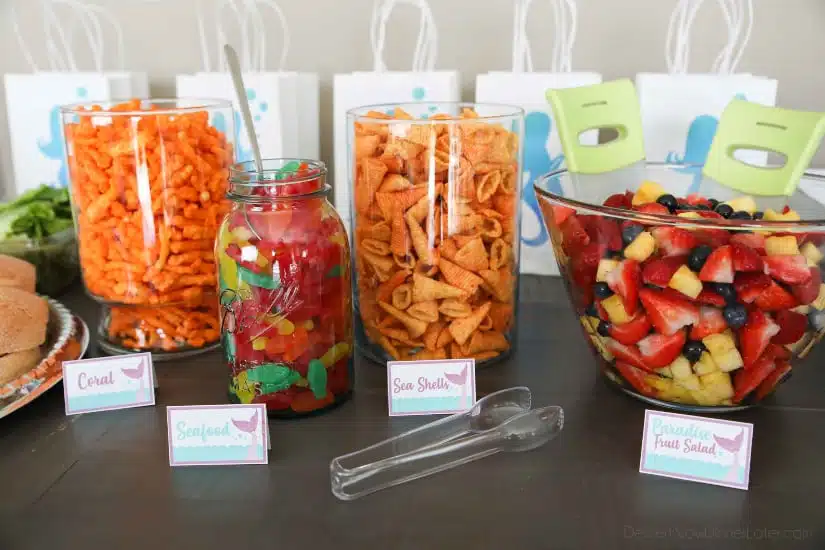
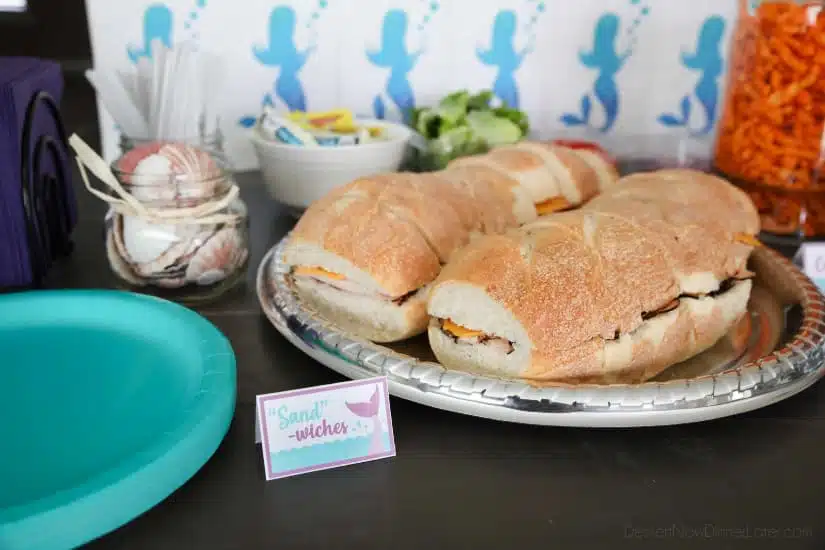
We had sub “sand-wiches” for the main part of our lunch. For sides we had Coral (Crunchy Cheetos), Seafood (Swedish Fish), Seashells (Bugles), and Paradise Fruit Salad (Strawberries, Blueberries, & Pineapple).
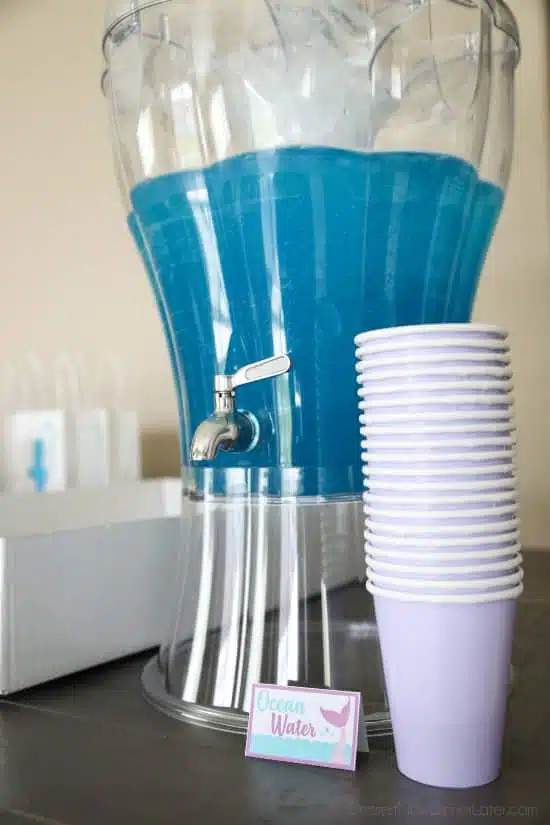
Our beverage was “Ocean Water” punch, which was just blue Hawaiian Punch and Sprite.
Mermaid Party Water Games
Water games were a must for our summer mermaid party. None of them were mermaid themed, but it was so fun to get wet on a hot day. Here is what we did:
To start, I had these Mermaid Color Pages with crayons and colored pencils on the table for the girls to have something to do until everyone arrived. Then we played these water games.
SPONGE RELAY — Two teams, two large car wash sponges, and four small dollar store buckets. One bucket is full of water at the front of each line. The bucket at the back of each line is empty. Team members stand in a line facing the bucket full of water. The first person in line from each team soaks up as much water with the sponge as they can, then passes it over their head. The next person passes it underneath, between their legs, then over, under, over under, etc. The last person squeezes as much water as they can from the sponge into the empty bucket and heads to the front of the line to re-soak the sponge and continue the relay. The game is over when either team’s front bucket is empty. The team that has the most water in their back bucket wins. You can also do this Sponge Toss Game with the same equipment.
PASS THE WATER — This game is almost the same as the sponge relay. Two teams, four buckets, and a plastic cup for each team member. The bucket at the front of the line is full. The bucket at the end of the line is empty. Team members can stand or sit. The first person in line from each team scoops water into their cup, lifts it above their head and tries pouring it into the cup of the person behind them. The person behind will want to try and catch as much water as they can so they don’t get soaked! This process repeats until it reaches the end of the line where the last person pours the water over their head and into the empty bucket. The last person races to the front of the line and the relay starts again. The game is over when either team’s front bucket is empty. The team that has the most water in their back bucket wins. Idea from Girl and a Glue Gun.
WATER BALLOON SPOON RACE — Two teams, two large wooden or plastic cooking spoons (the longer the handle the harder it will be), filled water balloons, orange plastic cones or something for a start and end point. One member of each team balances a water balloon on a large cooking spoon while holding the end (not middle) of the stick with one hand. Team member then races to the end point (around the cone) and back to the start, transferring the spoon to the next team member. Officiator or one member of each team should be ready to replace balloons that have been dropped. The team member can either start over at the beginning, or start from the point that the balloon popped. (Set the rules before the race starts.) The winning team has the most balloons leftover or the least amount dropped after all team members have crossed the finish line.
WATER BALL CATCH — Two teams, water sponge balls (I bought these in packs of four mini water balls at the dollar store — we used six packs, or 24 balls total), two buckets (one per team), and a child pool full of water. Water balls are submerged in the pool of water. Each team has one bucket and a person designated to be the catcher. On the count of three, members from each team grab as many balls as they can from one side of the pool and throw them at their team’s catcher a few feet away from the other side of the pool. The team with the most balls in their bucket wins! This is a quick game. Repeat this for more children to be able to be the catcher.
Here are some more fun Water Activities you might want to use for your party.


This frosting is the BEST!! Tastes great and is easy to work with. My cupcake cake turned out very cute.
Yay! I’m so glad you enjoyed the frosting and that your cake turned out cute!
This worked great! I had to make an eggless cupcake so I used a different recipe for that, but the buttercream recipe was perfect and I had enough leftover to frost about 5 more cupcakes. I used my daughters favorite colors: pink, purple, and light teal. She loved it.
I bet they looked awesome! Thanks for sharing your experience with this recipe/tutorial Hannah!
Hello, what are the dimensions of the full sized board?
About 18×26-inches.
How do you make sure the icing doesn’t fall in between the gaps? Is the icing thick enough that it’s more stable?
As long as it’s not too hot in the room or the piping bags are warmed too much in your hands, the frosting shouldn’t slide off. Make sure you tape the cupcakes to the board close together as well.
Wow Amber! This Mermaid Tail Cupcake Cake looks amazing! What a fun party too. 🙂
Thanks Becky! It was a lot of fun to make and such a fun party to throw!