
Perfect Pie Crust {Tutorial}
This post may contain affiliate links, meaning that I may receive a commission at no cost to you if you use a link provided. All opinions shared are my own. You can review my full disclosure policy here.
This perfect pie crust recipe uses Crisco shortening, an egg, and vinegar for a fool-proof pie crust that will hold its shape and create a perfectly flaky pie crust. Plus, a photo tutorial to show you just how easy it is to make!
I get that a lot of people shy away from pie crust, but it is a lot simpler than you think!
Today I am sharing my tips and tricks to perfect pie crust! I am going to tell you how and why, so by the end of this tutorial, you can be educated and ready to make that special pie for Thanksgiving or Christmas.
This is THE pie tutorial you will want to keep pinned for reference! We’ll start with the recipe, followed by the step-by-step photos.
This is currently my favorite pie crust recipe. It’s much more forgiving than an all butter pie crust, which I also have a recipe and tutorial for.
Shortening simply has a higher tolerance for room temperature than butter, because butter has more moisture. Grab your ingredients and let’s get started!
Perfect Pie Crust
Ingredients
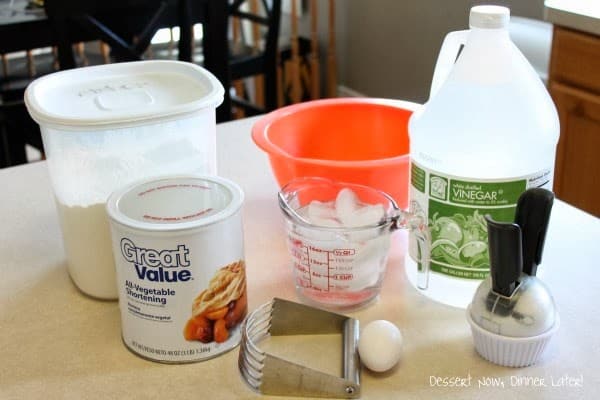
- 3 cups all-purpose flour
- 1 tsp salt
- 1 cup shortening (I prefer Crisco butter flavored, if you have it)
- 1 whole egg
- 5 Tbsp + ice cold water
- 1 Tbsp white vinegar
Instructions
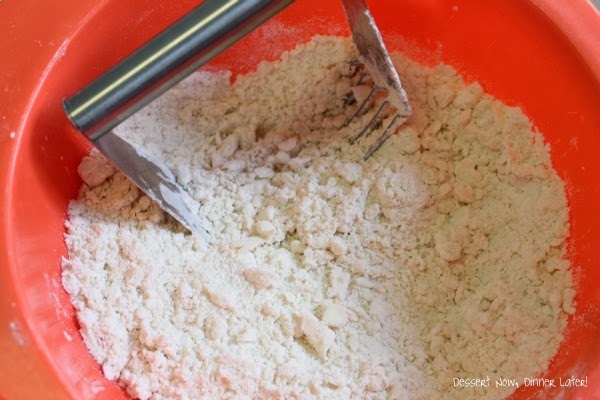
- Gather all your ingredients. I like to fill a whole glass measuring cup with ice water. Combine flour & salt in a large bowl. Stir. Cut in shortening with a pastry blender, two forks, or pulse in a food processor until pea sized chunks are achieved. You do not want to crumble this mixture because those little balls of shortening are creating pockets of air in your pie crust, which become the flaky layers you want to achieve.
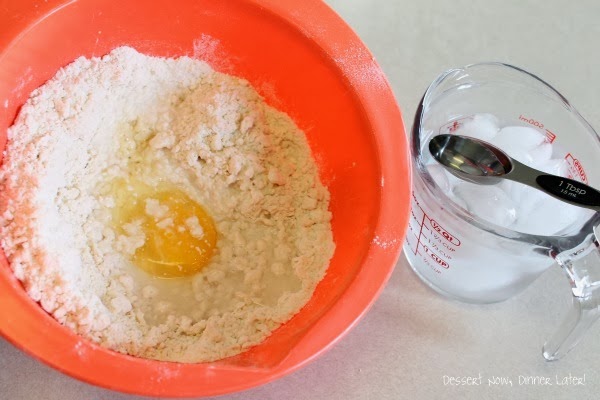
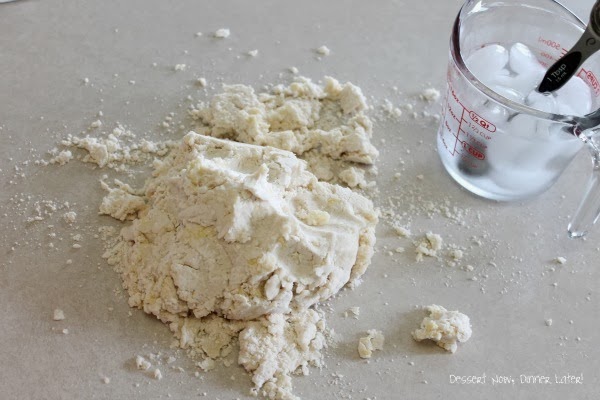
- Add the egg, 5 Tbsp cold water & 1 Tbsp white vinegar. Mix with your hands. Keep adding water 1 Tbsp at a time until the mixture is less crumbly & is starting to come together. Empty the contents from the bowl onto the counter. Continue to add just enough water for the dough to come together, but not be sticky.
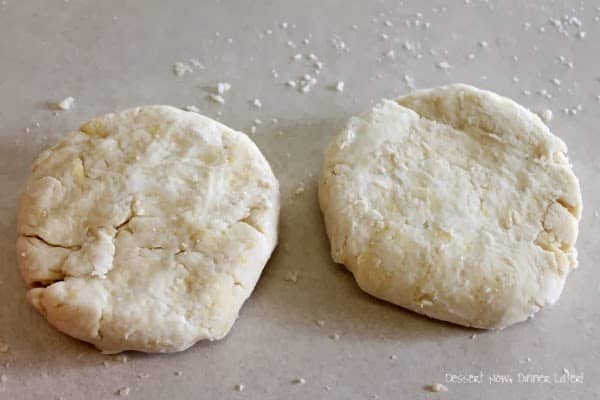
- Cut dough in half & create 2 flat discs. Saran wrap the discs & place them in the fridge for 15 minutes.* This gives the dough time to rest & keeps the shortening solid, since you want those flaky layers.
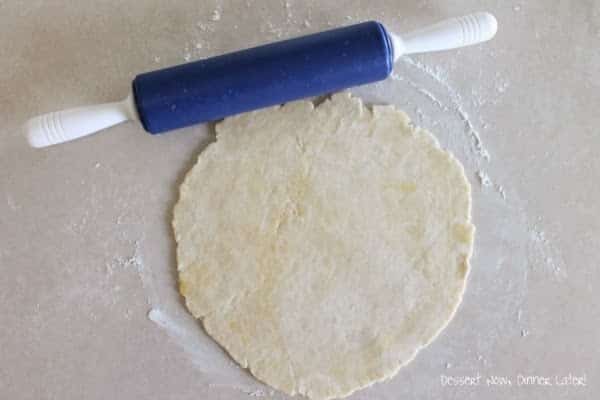
- Once the dough has chilled, remove one piece at a time as you work on your crust. Flour your surface & rolling pin. Roll from the center outwards & rotate the dough after a few rolls. Add extra flour underneath as necessary, so it doesn't stick to the counter. Continue rolling & rotating the crust until the dough is about ¼" thick & nice & round.
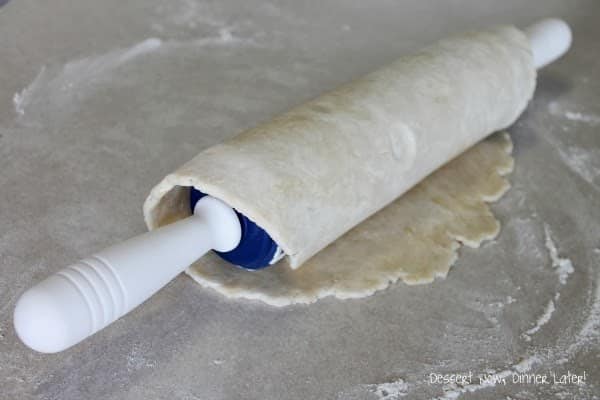
- Next, I like to roll my dough up around my rolling pin to make it easier to transfer to the pie dish. When you set your dough into the pie dish, sink your crust down from the sides so that it's not being stretched. The dough will shrink even more as it bakes, so you want to press the sides down towards the bottom of the dish forming the dough as close the the size & angles of the pie dish as possible.
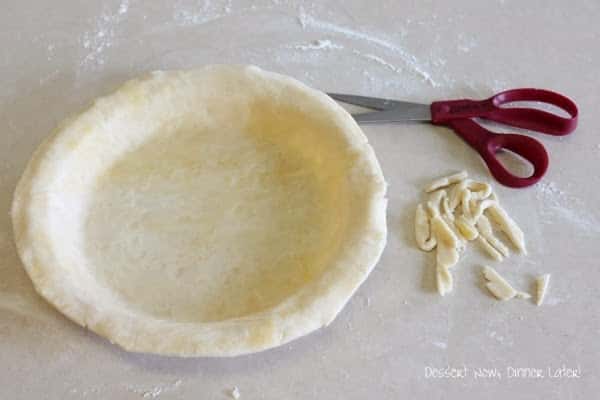
- Leave a good ½" space over the edge, but trim up any scraggly edges. You may freeze the other pie crust disc for later if you double wrap it, or if you are doing a double crusted pie, go ahead & roll out the other disc. Fill the pie shell with your choice of filling. Wet your finger & run it around the edge of the crust, this will help seal the two pieces together. Place the top crust onto the pie. Cut off excess edges & proceed with the crimping as stated in the next steps.
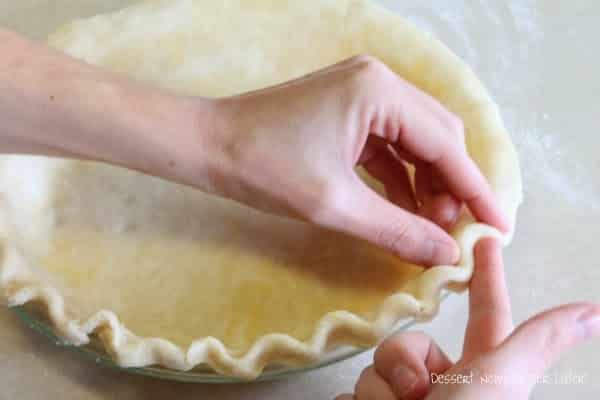
- Crimp the edges of the dough by pushing the pointer finger of one hand into the thumb & pointer finger of the other hand. You are kind of tucking that extra crust around the edges as you crimp. This makes that crimped edge nice & thick & less likely to break. This crust is ready for pie filling, or if you want to use it for cream pies, you need to blind bake it.
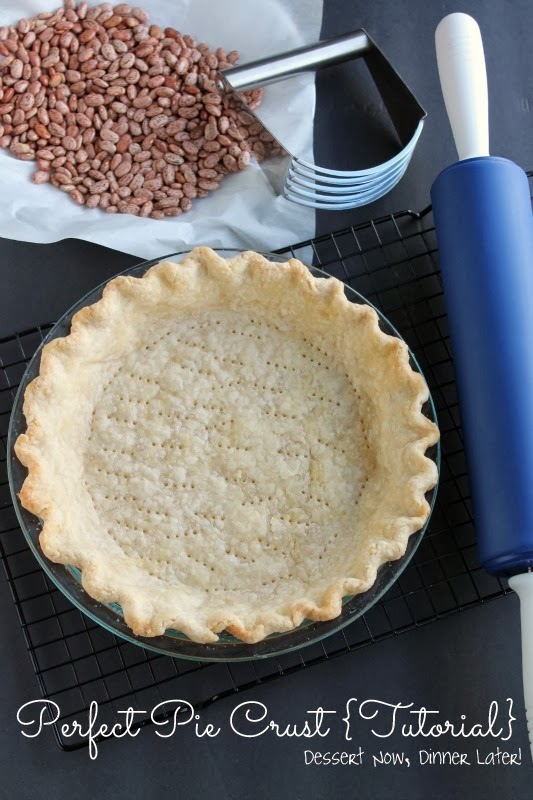
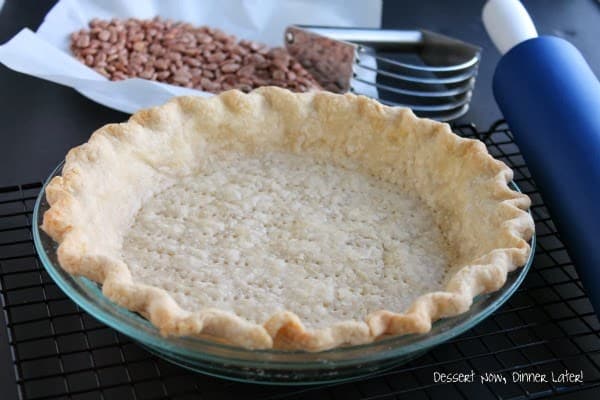
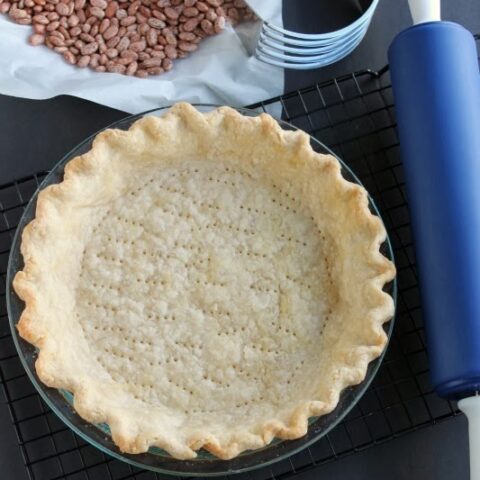
- To blind bake the crust for cream pies, go ahead & dock/pierce the bottom of the crust with a fork. Place a piece of parchment inside the shell & fill it with raw, dry beans, about ½ pound. I used pinto, but it doesn't matter, whatever you have is fine. NOTE: These beans are no longer good to cook & eat afterwards, but I keep them in a container just for pie baking purposes. The beans act as a weight so the pie crust doesn't bubble up & it stays in place all the way around the dish, keeping the crust from sinking downwards.
- Bake at 350*F for 20 minutes. The exposed edges will look dry & will have just started to turn light brown. Pull the parchment with the beans out of the crust. The bottom will look wet. You will now return the crust to the oven for 12-15 minutes to finish baking the bottom part of the crust.
- Remove the crust from the oven when it is light brown & the bottom no longer looks wet. Use for cream pies.
- Note: If you are baking a pie with a double crust, you need to cut slits into the top layer & bake the pie for a minimum of 1 hour or until the filling bubbles & the crust is brown. You should notice through the slits in the crust if the filling has bubbled. If your crust is getting too brown, cover with foil until the filling bubbles. In my experience it usually takes 1 hour plus 10 to 15 minutes for the filling to bubble & the crust to be completely baked.
Notes
- NOTE: If you work quickly, it is easiest to roll the crust right away without chilling it. (Make sure to keep the other half in the fridge while you roll the first crust out.) If you decide to roll the crust right away, you will want to chill the entire pie in the freezer for 10-15 minutes before baking it.
Nutrition Information:
Yield: 8Amount Per Serving: Unsaturated Fat: 0g
Recipe adjusted from The Pioneer Woman
PIE CRUST TUTORIAL – PHOTO STEPS
Gather all your ingredients. I like to fill a whole glass measuring cup with ice water.
Combine flour & salt in a large bowl. Stir. Cut in shortening with a pastry blender, two forks or pulse in a food processor until pea sized chunks are achieved.
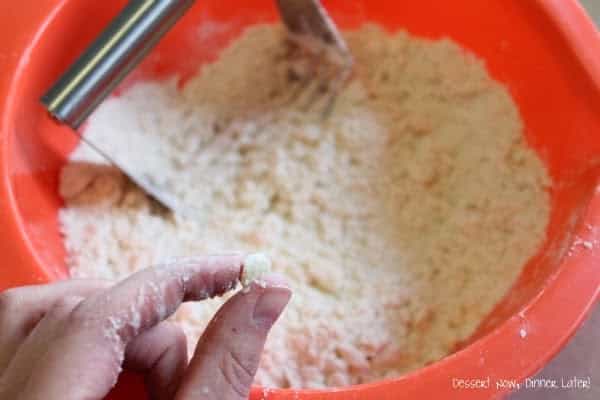
You do not want to crumble this mixture because those little balls of shortening are creating pockets of air in your pie crust, which become the flaky layers you want to achieve.
Add the egg, 5 Tbsp COLD water & 1 Tbsp white vinegar. Mix with your hands. Keep adding water 1 Tbsp at a time until the mixture is less crumbly & is starting to come together. (COLD water is essential to pie crusts because it helps keep the shortening or butter solid so it can melt during the baking process & create those flaky layers.)
Empty the contents from the bowl onto the counter. Continue to add just enough water for the dough to come together, but not be sticky.
Cut dough in half & create 2 flat discs. Saran wrap the discs & place them in the fridge for 15 minutes. This gives the dough time to rest & keeps the shortening solid, since you want those flakey layers.
Once the dough has chilled, remove one piece at a time as you work on your crust. Flour your surface & rolling pin. Roll from the center outwards & rotate the dough after a few rolls. Add extra flour underneath as necessary, so it doesn’t stick to the counter.
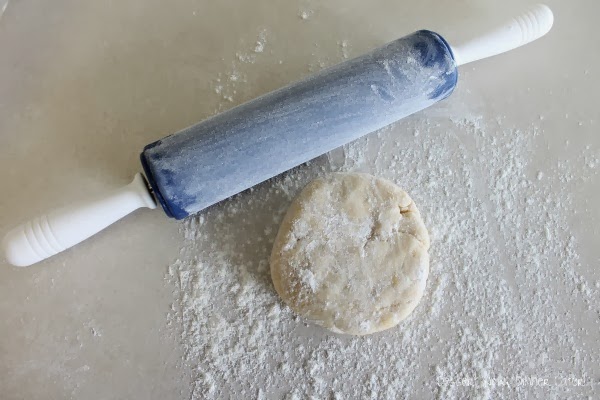
Continue rolling & rotating the crust until the dough is about 1/4″ thick & nice & round.
Next, I like to roll my dough up around my rolling pin to make it easier to transfer to the pie dish.
When you set your dough into the pie dish, sink your crust down from the sides so that it’s not being stretched. The dough will shrink even more as it bakes, so you want to press the sides down towards the bottom of the dish forming the dough as close the the size & angles of the pie dish as possible.

Leave a good 1/2″ space over the edge, but trim up any scraggly edges. You may freeze the other pie crust disc for later if you double wrap it, or if you are doing a double crusted pie, go ahead & roll out the other disc. Fill the pie shell with your choice of filling. Wet your finger & run it around the edge of the crust, this will help seal the two pieces together. Place the top crust onto the pie. Cut off excess edges & proceed with the crimping as stated in the next steps. (The photos in this tutorial are good for pumpkin pie or blind baking the crust for a cream pie.)
Crimp the edges of the dough by pushing the pointer finger of one hand into the thumb & pointer finger of the other hand. You are kind of tucking that extra crust around the edges as your crimp. This makes that crimped edge nice & thick & less likely to break.
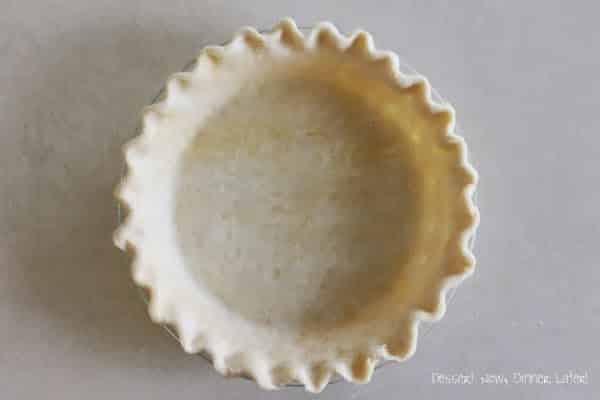
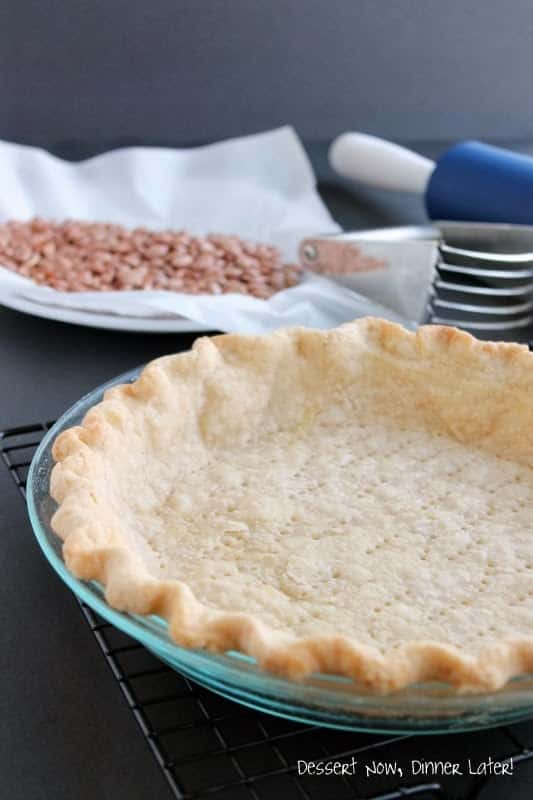
The final prepared crust should look marbled with bits of shortening. It should also be sturdy & as even as possible. This crust is ready for pumpkin pie filling, or if you want to use it for cream pies, you need to blind bake it: i.e. bake it while it’s empty. Keep reading for those steps.
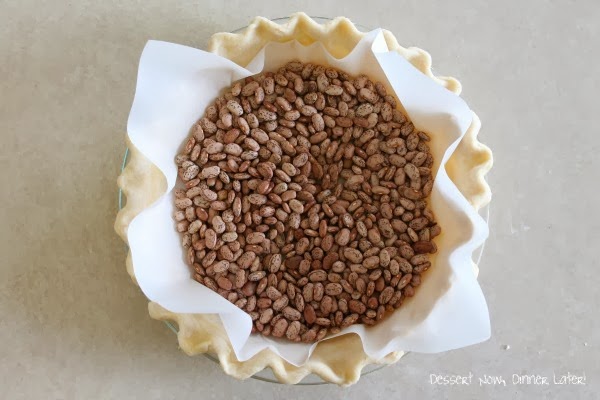
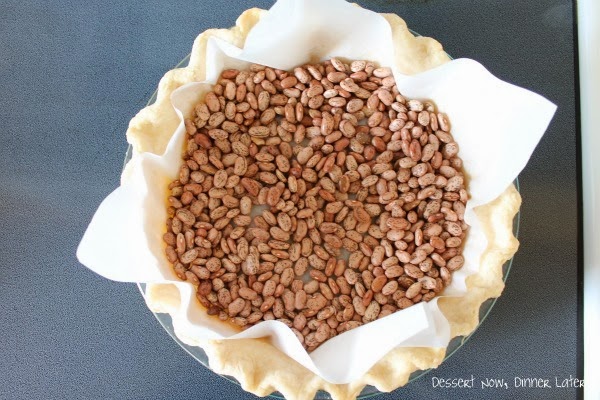
To blind bake the crust for cream pies, go ahead & dock/pierce the bottom of the crust with a fork.
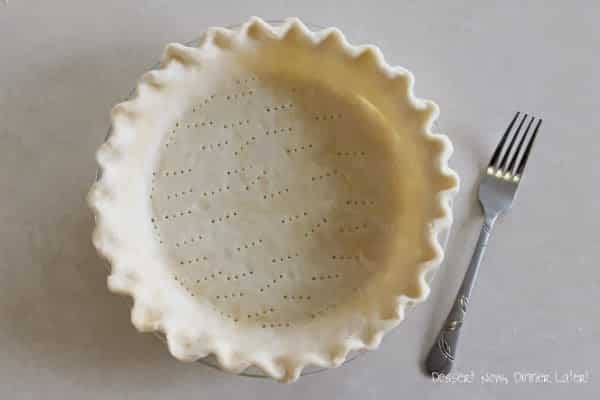
Place a piece of parchment inside the shell & fill it with raw, dry beans, about 1/2 pound. I used pinto, but it doesn’t matter, whatever you have is fine. NOTE: These beans are no longer good to cook & eat afterwards, but I keep them in a container just for pie baking purposes. The beans act as a weight so the pie crust doesn’t bubble up & it stays in place all the way around the dish, keeping the crust from sinking downwards.
Bake at 350˚F for 20 minutes. The exposed edges will look dry & will have just started to turn light brown.
Pull the parchment with the beans out of the crust. The bottom will look wet. You will now return the crust to the oven for 12-15 minutes to finish baking the bottom part of the crust.
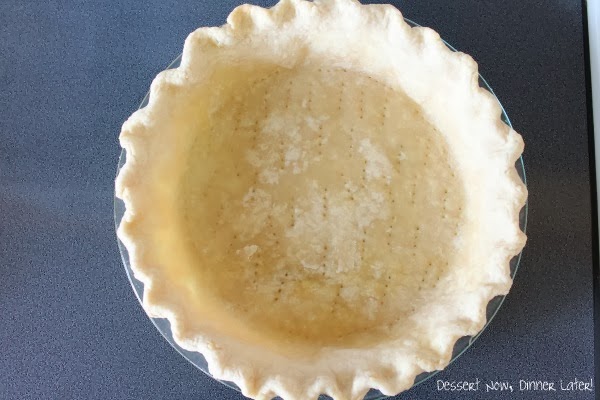
Remove the crust from the oven when it is light brown & the bottom no longer looks wet. Use for cream pies.
Note: If you are baking a pie with a double crust, you need to cut slits into the top layer & bake the pie for a minimum of 1 hour or until the filling bubbles & the crust is brown. You should notice through the slits in the crust if the filling has bubbled. If your crust is getting too brown, cover with foil until the filling bubbles. In my experience it usually takes 1 hour plus 10 to 15 minutes for the filling to bubble & the crust to be completely baked. I hope you enjoyed this tutorial & maybe learned something new! Happy Holidays!
You Might Also Like...
Leave a Reply

Welcome!
Hi, I’m Amber! I am a culinary graduate and dessert lover! This is where I share my favorite sweet and savory recipes alongside my knowledge and skills as a culinary graduate. I hope you find something you like!


32 Comments on “Perfect Pie Crust {Tutorial}”
Dear amber,
I love ur blog
So helpfull
The pictures are tempting
Do u mind to have behind the scenes pictures for photo tutorial
Hi Debi!
I’m not sure I quite understand your question, but I do happen to have a picture on instagram of me doing this tutorial: https://www.instagram.com/p/uyG5ynGPQP/?taken-by=amber_dessertnowdinnerlater
Thanks for your kindness!
I’m going to have to try this! I love the idea of baking it with the beans on top! I hate when you get huge air pockets in the crust. 🙂
Yes! It helps weigh down the crust so there are no bubbles. Fun little trick, right?!
Is your shortening cold or just room temp?
I use room temperature, but it’s always better cold, if you have time to do that.
Love this! Wish I had found it before Thanksgiving. My crust wasn’t nearly as tender and flaky as I would have hoped!
Well, shucks! You can try again for Christmas though! 😉
I love the step by step photos, very reassuring. I don’t do pies very much (apart from mince pies and jam tarts which are little and therfore non scary) because I’m always afraid of a soggy bottom. You have given me confidence, I will be pinning for future reference!
If you get a soggy bottom, it’s because your crust was not chilled properly. Don’t let it get too warm, but this crust is harder to screw up b/c it’s shortening instead of an all butter crust. 🙂
Thank you SO much for this! I have always been scared of pie crusts but this year I am totally going to go for it! Great tutorial!
You’re welcome! Thanks for stopping by! 🙂
Confession: I’ve never made pie crust! My sister put my in charge of desserts for Thanksgiving, so I’m going to give this a shot! Thanks for the great tutorial Amber!
NEVER?! Wow, well, you can do it! Let me know if you have any questions, but hopefully my tutorial is plain & simple & reassuring 🙂
Awesome tutorial! Pie crust always intimidates me!
I get that a lot of people have troubles with it, so hopefully this makes many people less fearful & more prepared to do a good job 🙂
Thanks for the tutorial and tips – I’m thinking of making a pie this week! This came at just the right time 🙂
Yvonne @ TriedandTasty.com
Yvonne, you can totally do it girl! Call me if you have any questions 🙂
This step-by-step tutorial is fabulous! Thank you so much for sharing – and let the pie making begin!
Thanks Kaylynnn!