Cut-Out Sour Cream Sugar Cookies

First of all, Happy Valentine’s Day! I hope you all have someone special to share the day with: a significant other or a best friend or your family. Have fun today! One of my friends asked me if I would do some high-heel shoe sugar cookies for an event she was in charge of & even though I hate cut-out sugar cookies for a reason (read why HERE) I said that would be fine. I wanted to try my hand at royal icing again because it has been like 7 months since I last tried it. These cookies weren’t that bad actually. The dough was easy to work with & it didn’t look awful re-rolled. They are actually quite soft & a perfect base for a sugar cookie. I tried a different royal icing this time, but it still made a TON of icing. Maybe third time is a charm & I will realize I need to like half the recipe, even if I am icing like 90 cookies.

Anyway, if you want a soft sugar cookie that holds it’s shape this is great. If you want to give royal icing a go, this recipe was super easy to whip up. I am still figuring out how to thin it (for different consistencies), and I think I am going to go buy clear plastic bottles next time & give that a go instead of my pastry bags. I think it might be easier & I won’t have icing pooping out the top of my bag (even when there is a rubber band on it.) Okay, enough talk…check out the cute shoes! I think they turned out fairly nice. Sadly, I hit my groove & picked up the pace on the last tray I was decorating, but now I know what works best & will give you my tips so you can have success!

Cut-Out Sour Cream Sugar Cookies
Ingredients
- 5 ½ cups (660 g) all-purpose flour, (stir, spoon & level)
- 1 tsp baking soda
- ½ tsp salt
- 1 cup (226 g) butter, softened
- 2 cups (400 g) granulated sugar
- 1 cup (240 g) sour cream
- 2 large eggs
- 2 tsp vanilla extract
Instructions
- In a large bowl, combine flour, baking soda, & salt. Set aside.
- Cream butter & sugar until light & fluffy. Add sour cream, eggs & vanilla until combined. Scrape bowl.
- Gradually add flour mixture until incorporated. Divide dough in half onto two pieces of plastic wrap; flatten dough, wrap tightly & refrigerate until chilled, 1-2 hours. (Tip: Dough may be made to this point & refrigerated for up to 3 days or frozen for up to 1 month.)
- Preheat oven to 350˚F. Line baking sheets with parchment paper; set aside.
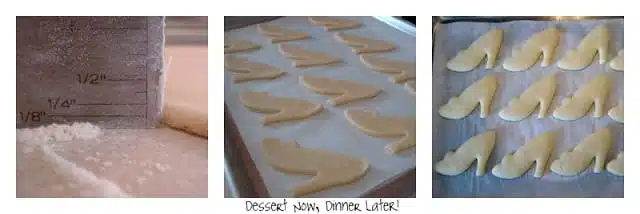
- Generously flour work surface & rolling pin. Unwrap one of the chilled pieces of cookie dough, place on floured surface & sprinkle extra flour on top. Starting at the center, roll the dough out until about ¼” thick, sprinkling with additional flour if needed, to avoid sticking. Dip cookie cutter in flour & cut out dough shapes. Transfer cut-out cookies to baking sheets.
- Bake 8-10 minutes until just done; before they brown on the bottom. Do NOT over-bake if you want a soft cookie. Allow cookies to cool on a baking rack. (Tip: cooled, unfrosted cookies, may be stacked in a sealed container & stored at room temperature for up to 3 days, or frozen for up to 2 weeks.)
Notes
- 1 cup water
- 6 Tbsp meringue powder
- 1 ½ tsp vanilla extract (use clear vanilla if you want white icing)
- 2 lb bag of powdered sugar
- In a stand mixer, using the paddle attachment, mix the water & meringue powder until it is incorporated & slightly foamy.
- Add extracts & mix for a few seconds.
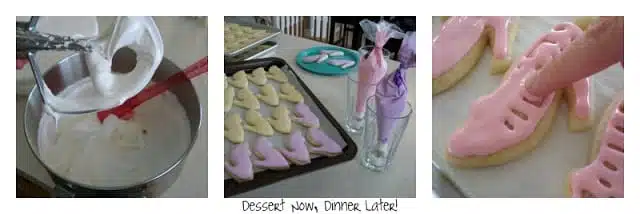
- Add the whole bag of powdered sugar. Mix on low until incorporated, then on high for a few minutes. It will become fairly stiff, & look smooth, glossy & leave peaks/ripples in the bowl where the paddle passes through the icing.
- Divide, thin & color icing as needed.
Did you make this?
Don’t forget to leave a rating below and make sure to follow on Pinterest and Instagram for more!
Recipe from The Yummy Life & re-written in my own words.
Royal Icing
*Use the icing AS-IS for piping, details, or words.
Save This recipe
Enter your email below to get a link to this recipe emailed straight to you to save later! Plus be signed up for all new recipes.
**Divide icing into separate bowls for different colors. COVER unused BOWL(s) with a damp dish towel while not in use. Mix in color until desired shade is achieved.
***Thin icing using 1 tsp of water at a time until desired consistency.
****Use clear pastry bags with rubber bands on the ends to help keep icing moist. Also, place unused pastry bags into a cup with a damp paper towel on the bottom to keep the tip from drying out when not in use.
Have fun decorating!

- For these shoe cookies I used a Wilton #3 tip for the white, pink & purple. I had colored & thinned my purple & pink icing to help it spread, but not so thin it falls off the cookie (which it did a little if I got too close to the edge.)
- I piped the border, did a zig-zag with the icing to fill in the cookie & used my finger to help spread the icing if it didn’t quite fill on it’s own. Technically I should have had two different bags for this part:
- The icing as stiff as it is when it’s made (no thinning) for the edges
- The thinner icing to fill the center
- You may also use a toothpick to pop any bubbles that form. I did have a few bubbles in my icing that I didn’t catch.
- Then I let the base colors (pink & purple) dry for an hour or so before I piped the white trim & bows with the icing AS-IS when it was first made.
Pretty simple, just a lot of cookies & I was using my toothpick to help spread the icing to fill in the gaps, but then I realized that was stupid & used my finger. LOTS faster. Then popped any air bubbles with the toothpick (do this before it dries, so only do a couple cookies at a time before moving on.)
Next time I wouldn’t be so lazy & I would use the white to pipe the edges & then thin the pink & purple enough to spread on it’s own without my finger. You live & learn right? But they still turned out cute so I am happy. 🙂









Adorable cookies and great tutorial, Amber. Would love for you to share at my linky party going on right now. http://www.mandatorymooch.blogspot.com/2013/02/tasty-thursdays-29.html
Thanks, Nichi – The Mandatory Mooch
Super cute!
So adorable! Great idea for favors at a bridal shower 🙂
Ali @ Forty before 40
Such cute cookies! I like cut-out cookies, but they can take a lot of time! I don’t make them very often anymore…. My kids like doing them though, so we really need to pull our recipe out again one of these days!
Coming by from Cheerios and Lattes!
These are adorable! I love sour cream cookies!