
Chocolate Mint Pie


Indulge in a Christmas Chocolate Mint Pie—flaky pie crust, chocolate ganache, and no-bake mint cheesecake filling topped with pieces of Andes thin mints.
Why You’ll Love this Recipe
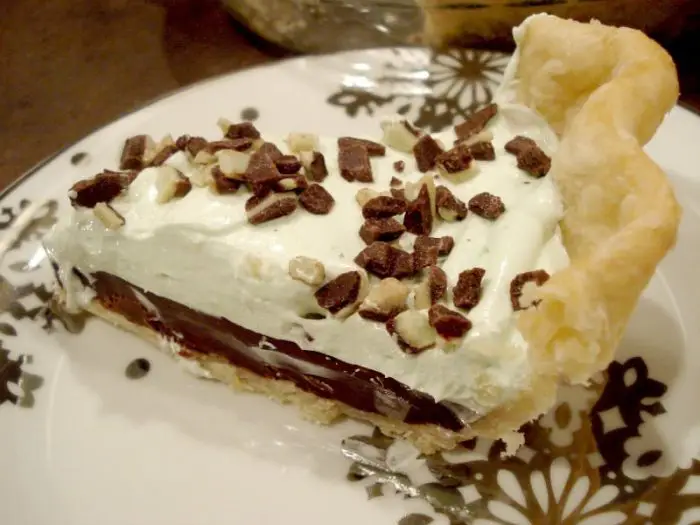
- Visual Appeal: Aesthetics matter, especially during the holidays. The layers of a flaky pastry crust, glossy ganache, and creamy mint cheesecake filling create a visually stunning dessert. The pie’s presentation alone is enough to make it a centerpiece at any holiday gathering.
- Festive Flavor Fusion: The marriage of rich chocolate, invigorating mint, and buttery pastry crust epitomizes the festive spirit. This pie offers a harmonious blend of flavors that resonate with the holiday season, making it a perfect addition to your festive dessert spread.
- Sensory Delight: The combination of textures, from the crispness of the flaky crust to the velvety ganache and the smooth cheesecake, provides a delightful sensory journey with each bite.
Christmas Chocolate Mint Pie
Thanksgiving isn’t the only holiday that deserves pie. Pie for Christmas is a great dessert choice, especially when making this chocolate mint pie. It’s a must-make flavor combo for the holiday season and the layers are a sight to behold.
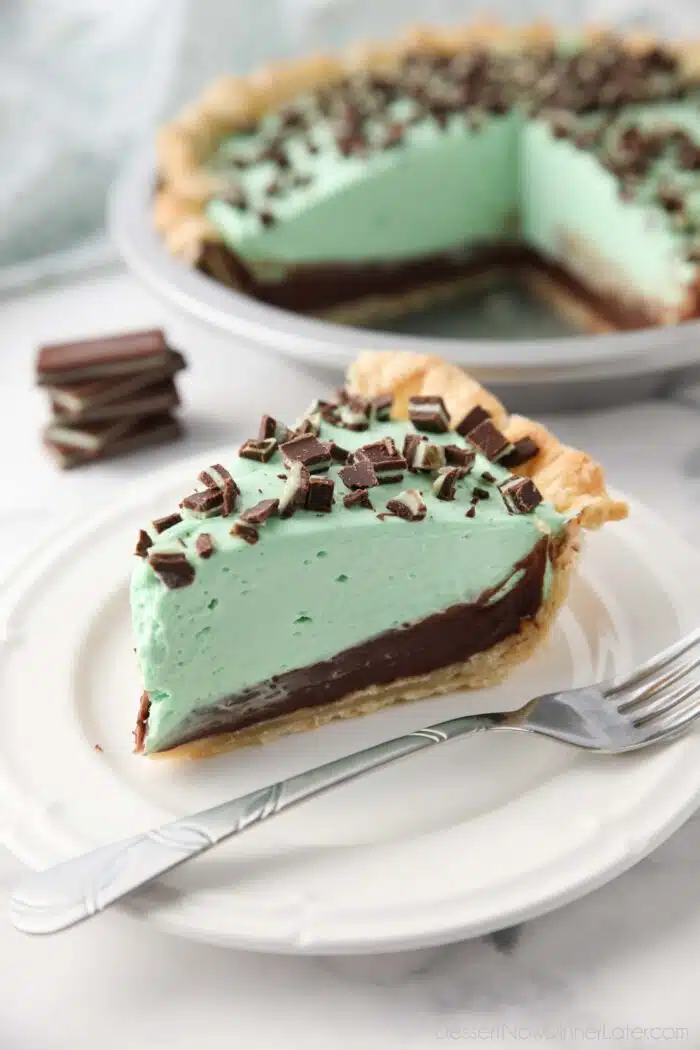
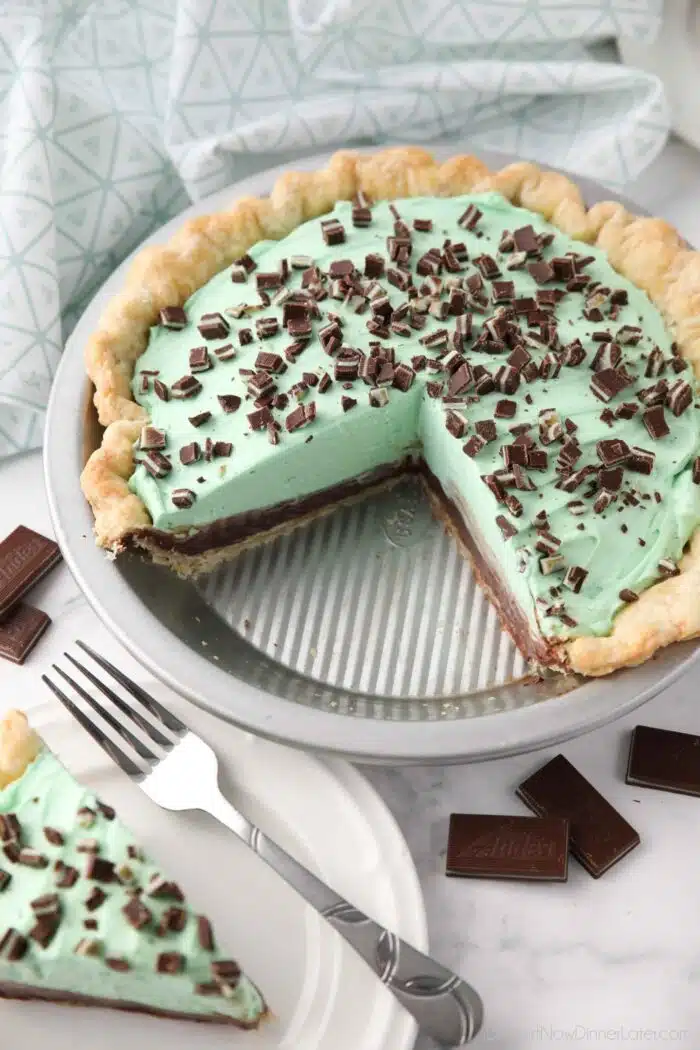
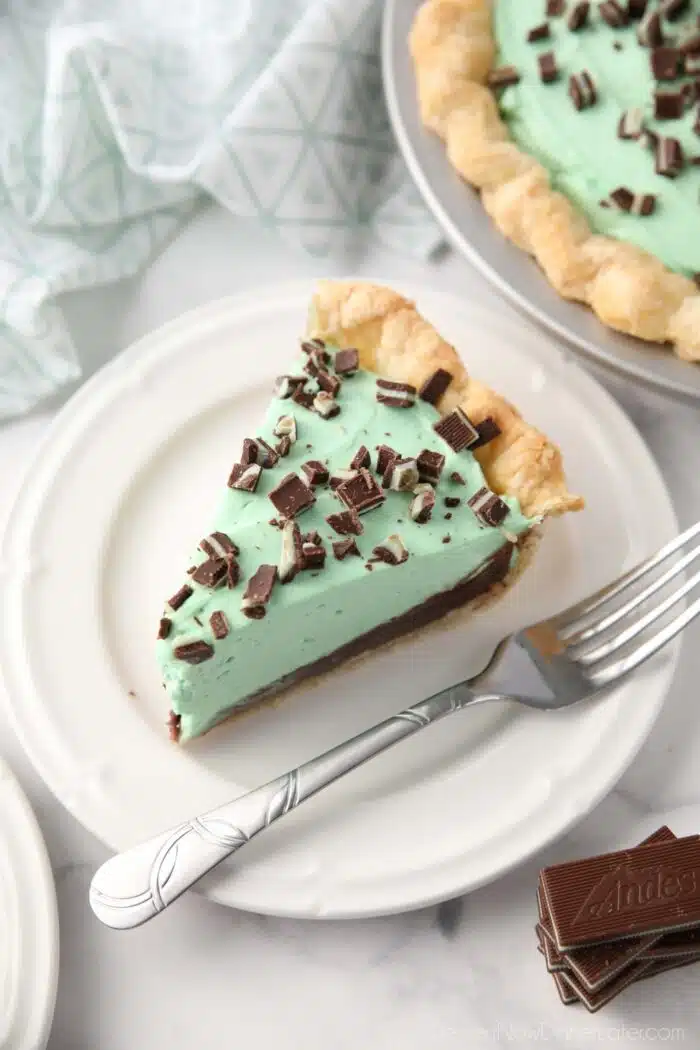
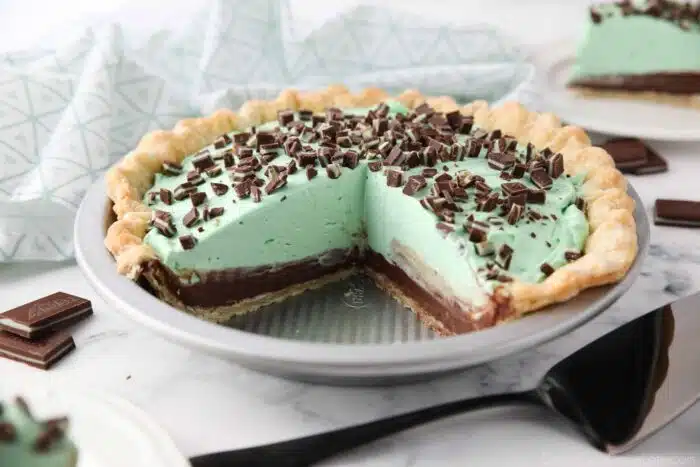
Chocolate mint pie is the fancier version of grasshopper pie because it uses an all butter pie crust (instead of an Oreo crust) and adds a layer of ganache on bottom before filling the pie with creamy mint no-bake cheesecake.
Save This recipe
Enter your email below to get a link to this recipe emailed straight to you to save later! Plus be signed up for all new recipes.
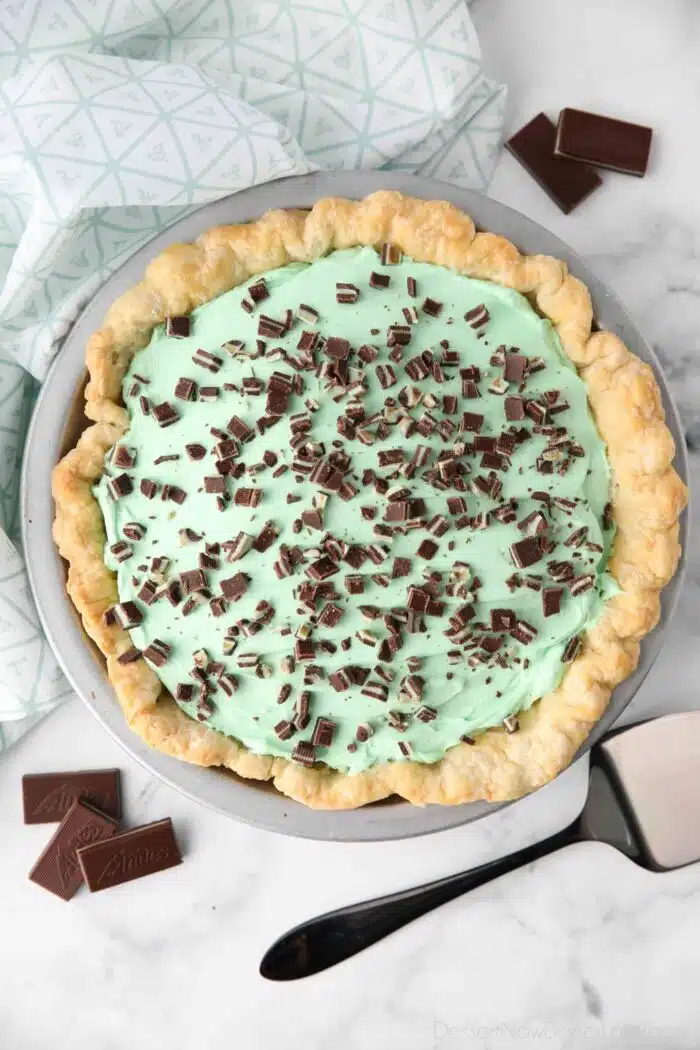
Chop up some Andes mints and sprinkle them on top to make it look pretty and you’ve got a holiday pie all decked out for the dessert table.
How to Make Mint Chocolate Pie
Any pie with ganache is going to be rich. So to balance the richness, I used a traditional pastry crust.
- First, blind bake the pie crust. (Bake an empty crust.) Allow crust to cool completely. Chill the baked crust in the fridge/freezer to speed things along.
Here’s my tutorial for how to blind bake pie crust whether it’s homemade or store-bought. You will need either parchment paper or foil to line the crust. And you can use dry beans, rice, or sugar, to hold the crust in place if you don’t have pie weights.

- Next make the ganache. Combine 2/3 cup of heavy cream with 6 oz of semi-sweet chocolate chips inside of a microwave-safe bowl or glass measuring cup. Microwave at half power in 30 second increments, stirring in-between each interval. Repeat until fully melted and smooth.
- Once melted, immediately pour the chocolate onto the bottom of the baked pie crust. Place pie in the fridge or freezer to chill the chocolate until firm enough to top with the next layer.
For the Mint No Bake Cheesecake Filling
While the chocolate ganache is chilling, prepare the whipped mint cream cheese filling.
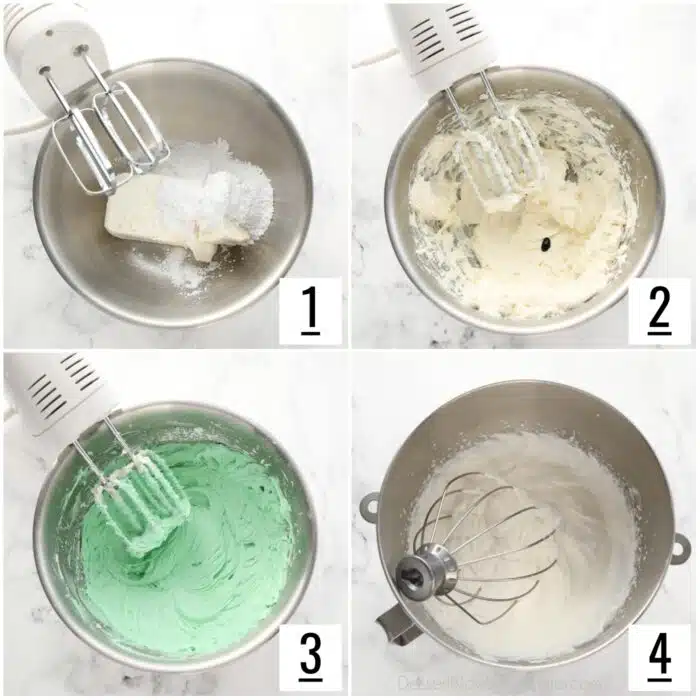
- Beat the cream cheese and 1 cup of powdered sugar together with an electric hand mixer inside of a large bowl until smooth.
- Add the mint extract and 3 drops or so of green food coloring.
- Mix until well-combined.
- Whip the heavy cream and 1/2 cup of powdered sugar together until stiff peaks, using a stand mixer with the whisk attachment.
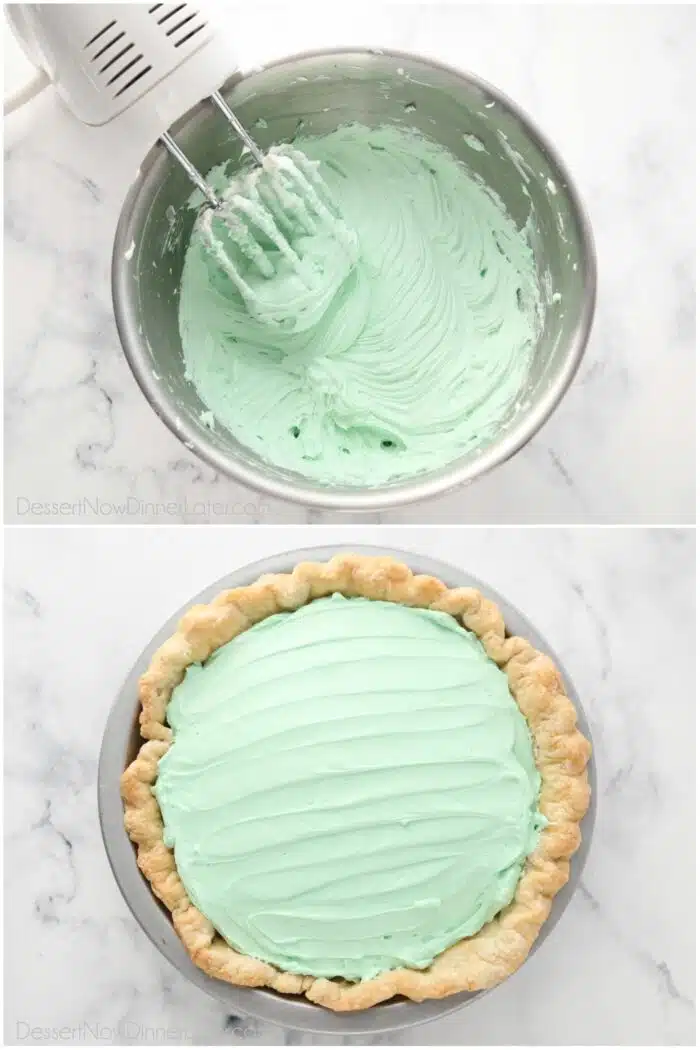
- Add the whipped cream to the mint cream cheese mixture. Use the electric hand mixer to beat the two mixtures together. Mixture should be very thick.
- Spread filling evenly on top of the layer of chilled ganache.
- Sprinkle chopped pieces of Andes mints on top of the chocolate mint pie.
Serving and Storing
- CHILL: Gently cover with plastic wrap. Chill the pie in the fridge for 2+ hours or until firm. Alternately chill the pie in the freezer for 30-60 minutes if desired, to speed things along.
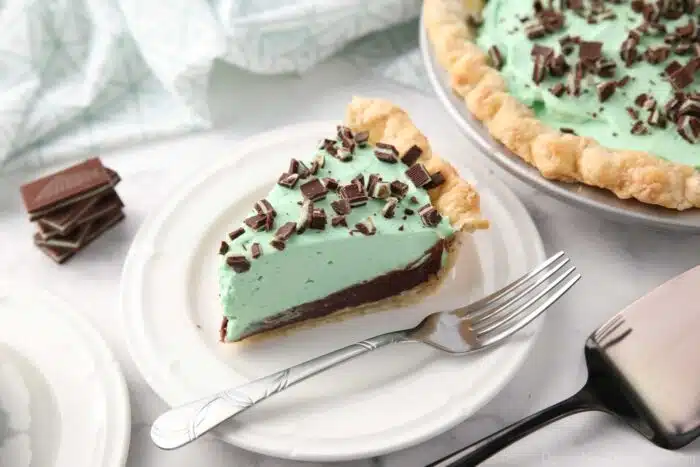
- CUT: To cut the pie, run a knife under hot water and dry it off with a towel before making each cut. This pie will serve 8-12 people, depending on the size of the slice. We prefer smaller pieces, since this chocolate mint pie is rich.
- STORE: Cover any leftovers with plastic wrap or foil and store in the fridge up to 5-7 days.
- FREEZE: To freeze, cover the chocolate mint pie tightly with plastic wrap and foil and freeze up to 3 months. Thaw in refrigerator overnight before serving.
Mint vs Peppermint
We used mint extract, which is a combination of spearmint and peppermint and goes well with Andes creme de menthe thin mints.
If you prefer peppermint, you can use peppermint extract and red food coloring instead of green (which may end up looking more pink) or leave the food coloring out. Then use the Andes peppermint crunch thins for the topping.
Andes also has mint and peppermint baking chips you can use, so you don’t have to chop up the chocolates.
More Mint Chocolate Desserts
- Mint Chocolate Chip Cookies
- Homemade Mint Oreos
- Mint Brownies
- Chocolate Mint Chip Cookies
- Mint Chocolate Rice Krispie Treats
- Mint Truffle Thumbprint Cookies

Chocolate Mint Pie
Ingredients
- 1 9-inch pie crust, homemade or store-bought
Chocolate Ganache
- ⅔ cup (159 ml) heavy cream
- 1 cup (170 g) semi-sweet chocolate chips
Mint No Bake Cheesecake Filling
- 12 oz (339 g) block-style cream cheese
- 1 ½ cups (180 g) powdered sugar, divided
- 1 to 2 tsp pure mint extract, not peppermint
- 3 drops liquid green food coloring
- 1 cup (237 ml) heavy cream
- 8 pieces Andes creme de menthe chocolates, chopped; optional, for garnish
Equipment
Instructions
- CRUST: Blind bake 1 empty 9-inch pie crust until golden brown. (See instructions on how to blind bake pie crust) Allow crust to cool completely. Chill the baked crust in the fridge/freezer to speed things along.
- CHOCOLATE GANACHE: Combine ⅔ cup of heavy cream with 6 ounces of semi-sweet chocolate chips inside of a microwave-safe bowl or glass measuring cup. Microwave at half power in 30 second increments, stirring in-between each interval. Repeat until fully melted and smooth.
- Once melted, immediately pour the chocolate onto the bottom of the baked pie crust. Place pie in the fridge or freezer to chill the chocolate until firm enough to top with the next layer.
- MINT LAYER: Beat the cream cheese and 1 cup of powdered sugar together with an electric hand mixer inside of a large bowl until smooth. Add the mint extract (start with 1 teaspoon) and 3 drops or so of green food coloring. Mix until well-combined.
- Whip the heavy cream and ½ cup of powdered sugar together until stiff peaks, using a stand mixer with the whisk attachment. Add the whipped cream to the mint cream cheese mixture. Use the electric hand mixer to beat the two mixtures together. Mixture should be very thick. (Taste and add more mint extract 1/2 tsp at a time, if desired.)
- Spread filling evenly on top of the layer of chilled ganache. Sprinkle chopped pieces of Andes mints on top of the chocolate mint pie.
- Gently cover with plastic wrap. Chill the pie in the fridge for 2+ hours or until firm. Alternately chill the pie in the freezer for 30-60 minutes if desired, to speed things along.
Video
Notes
- CUT: To cut the pie, run a knife under hot water and dry it off with a towel before making each cut. This pie will serve 8-12 people, depending on the size of the slice. We prefer smaller pieces, since this chocolate mint pie is rich.
- STORE: Cover any leftovers with plastic wrap or foil and store in the fridge up to 5-7 days.
- FREEZE: To freeze, cover the chocolate mint pie tightly with plastic wrap and foil and freeze up to 3 months. Thaw in refrigerator overnight before serving.
Nutrition
Did you make this?
Don’t forget to leave a rating below and make sure to follow on Pinterest and Instagram for more!
*Originally published 12/6/2011. Post updated November 2023.


I’ve made this twice now and I must say. The original amount of mint was a little much for my tastes. This second time I added Thin Mint Oreos to the crust and added only 1/4 tsp mint extract. It’s perfect! Minty. Chocolatey. And oh so fluffy. I also love the real cream and will garnish with original and thin mint Oreos when it’s time to serve this Thanksgiving. Thanks for sharing!
Thanks for sharing your experience with the recipe Janelle!
I made this once a couple years ago, I’m not sure if mint in a pie was intimidating or what, but it wasn’t a hit with my family (not many people wanted to try it, I can’t remember if anyone even did try it, now that I think of it…) BUT I’m not at all complaining, because that meant that I had practically the whole thing to myself! I’ve been craving it lately and can’t wait to make it again. It’s definitely one of my favorites. <3
Well shoot, I’m glad you liked it at least! It is definitely unique to other pies out there!
Hey Becky…Thanks! I am glad you are going to try it! I hope you like it as much as we did 🙂
Amber this looks amazing! I think I will give this a try and take it to the big family Christmas dinner. Thanks for the posts.